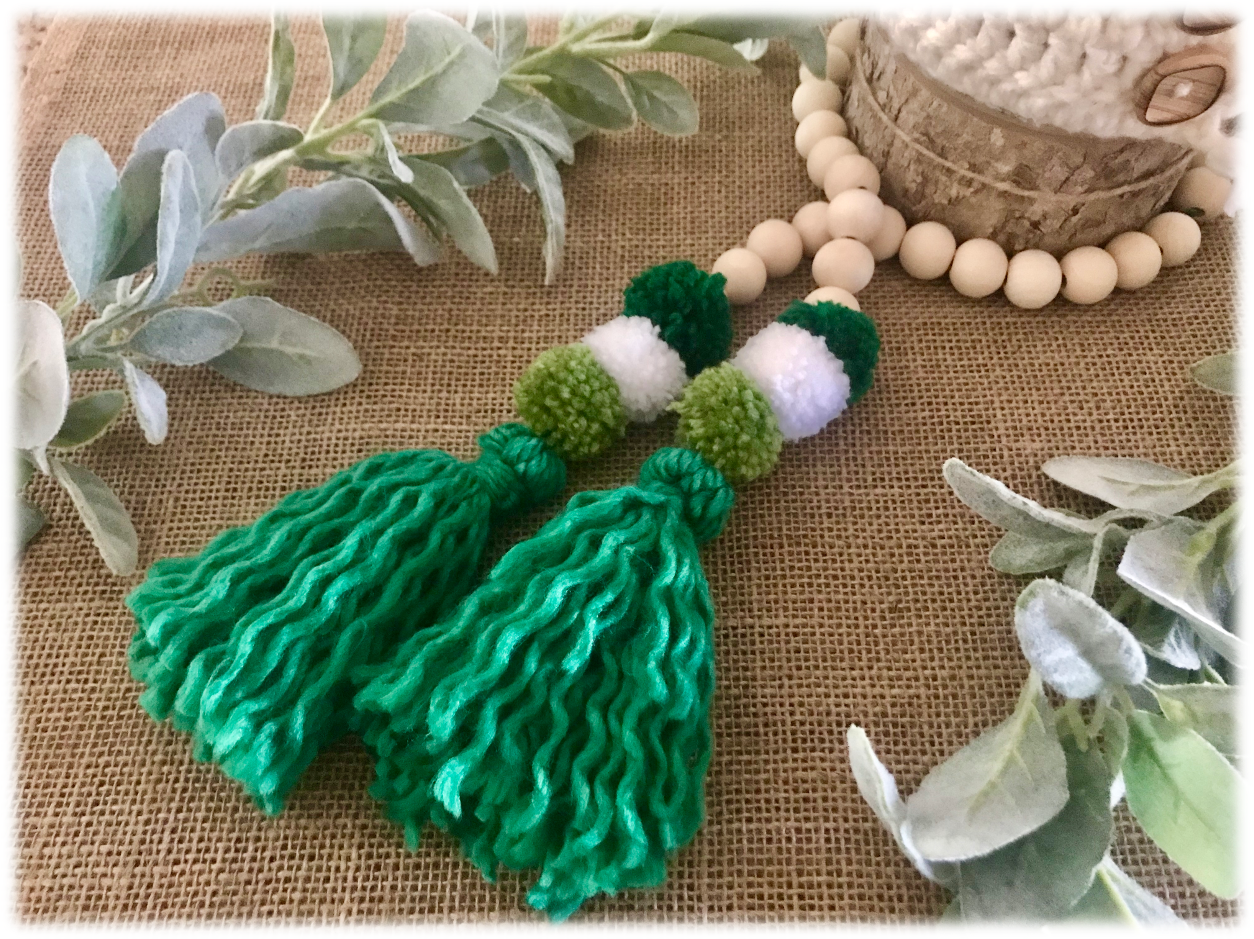
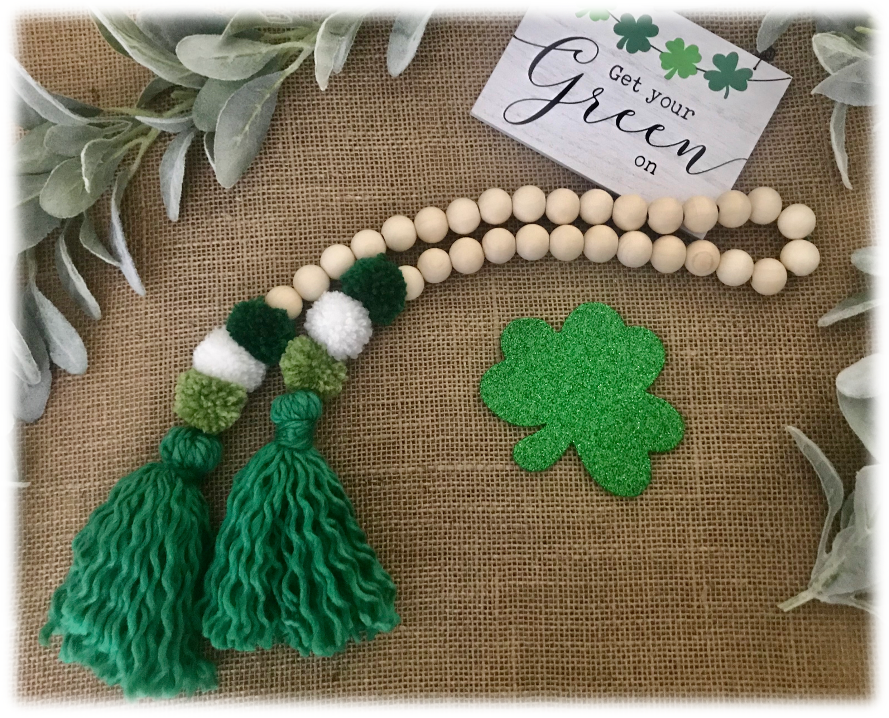
These DIY Tassel & Pom Pom Wood Bead Garlands are SO EASY to make and can be done in under an hour. The free directions are available below which include pom pom making instructions using just your fingers. For another pom pom making option I have included information about Clover Pom-Pom Maker sets that make pom pom making a breeze. With these simple, quick and easy garland directions, you may just find yourself making several!
INSPIRATION
I like to decorate my home for just about every holiday, including St. Patricks Day. I’ll admit I don’t have a lot of St. Paddy’s Day decor, but I do have a few leprechauns, four leaf clovers and cute signs that I put out every March 1st, and I thought this Tassel & Pom Pom Wood Bead Garland would make the perfect companion to my on hand decor. These wood bead garlands seem to be all the rage on ESTY and Pinterest and they truly do work up so quick and easy. Simply by changing the tassel and pom pom colors you can make one for every holiday, or match your home color scheme and make a few to accompany your day-to-day decor. These wood bead garlands are so current and make great gifts too!
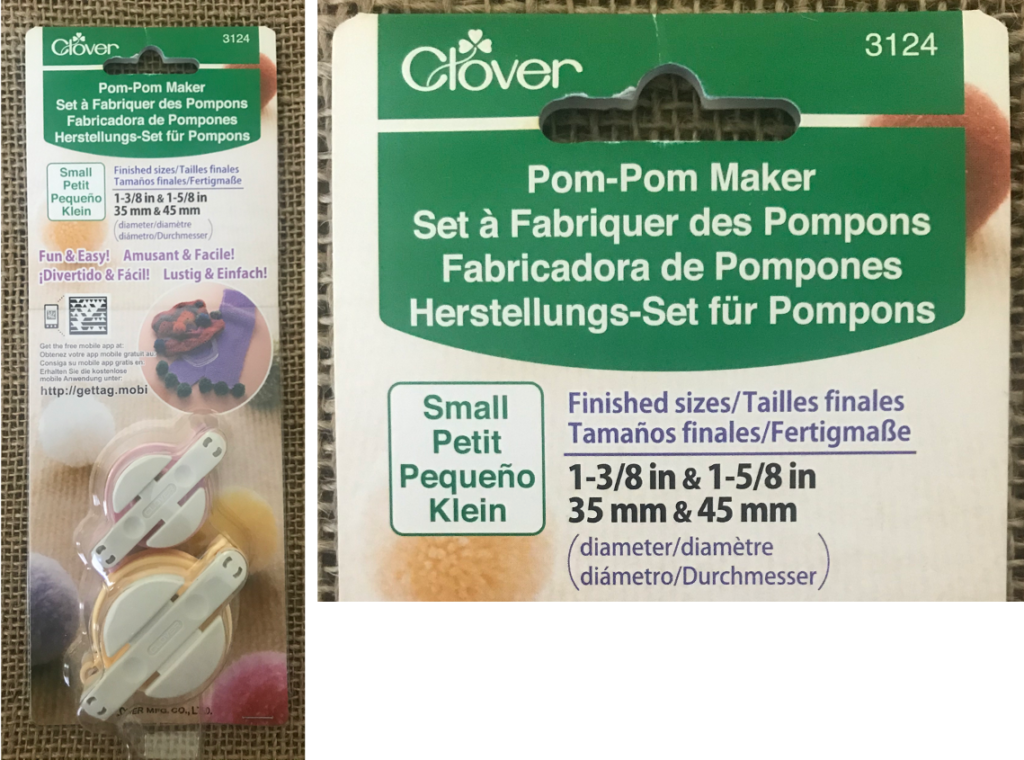
Clover Pom-Pom Maker Size Small / #3124 / 1 3/8″ – OPTIONAL (See notes below for pom pom making) Measuring Tape Scissors Tapestry Needle
PROJECT MEASUREMENTS
From tassel end to tassel end this Tassel & Pom Pom Wood Bead Garland measures approximately 37″ long
POM POM MAKING MADE EASY!
Every crafter would love a set of these MUST-HAVE Clover Pom-Pom Makers in their tool box. One more thing to make crafting easier!
These pom pom makers make pom pom making so easy, and I love that each individual maker is sized by measurement so you know approximately the size of the pom pom you are making. No guess work!
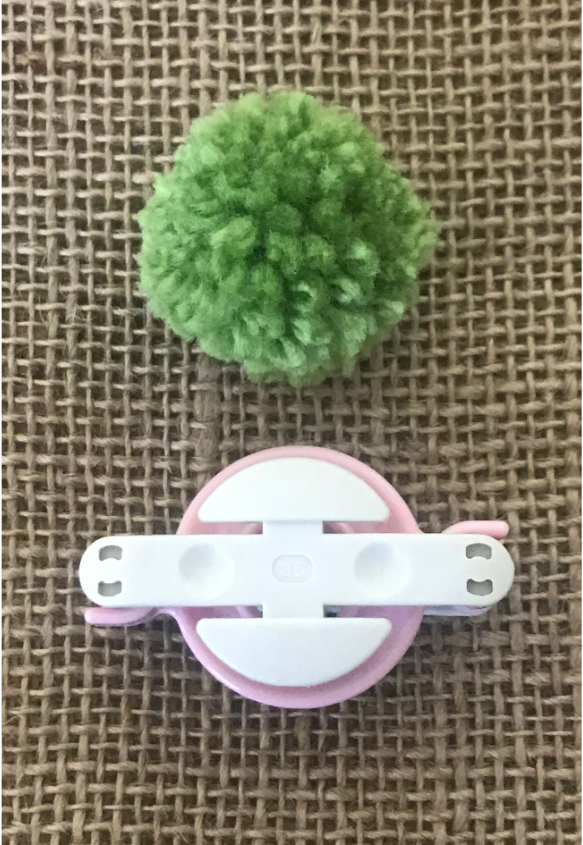
For this DIY Tassel & Pom Pom Wood Bead Garland I used the Clover set Small / 3124 / size 1 3/8″. In the pattern below I have also included pom pom making directions using just your fingers as another option.
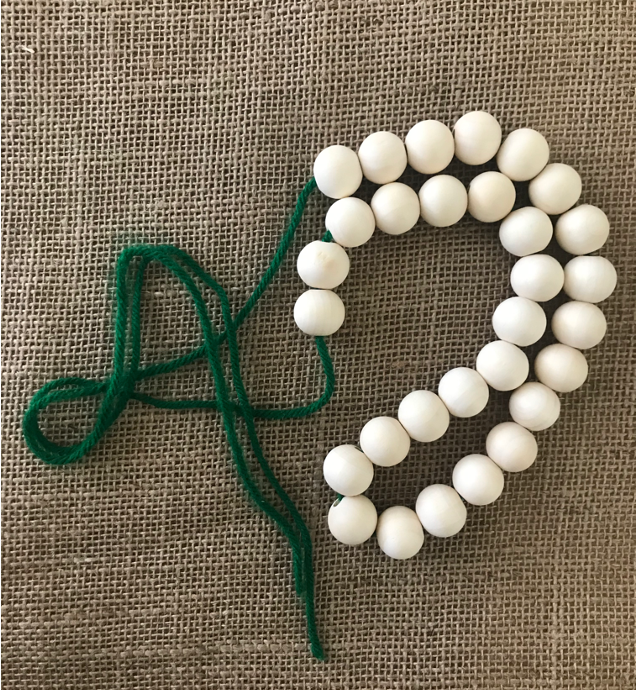
Using the PADDY GREEN yarn, cut a 90″ piece, then thread your needle with the yarn (left photo).
Begin stringing your beads until all 30 beads are on the yarn, leaving about 16 1/2″ of yarn on each end (right photo).
MAKING POM POMS - using fingers
** For this project I used a Clover Pom-Pom Maker but this finger method works great too.
NOTE: I like to put a paper towel under my work for easy clean up
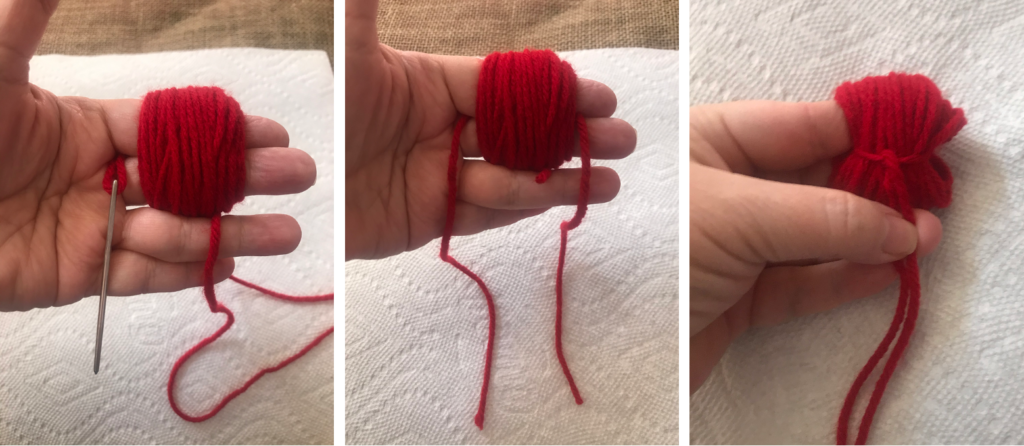
Measure about a 12″ piece of yarn the same color as your pom pom color. Thread your needle with the yarn and set it aside for now (left photo).
From your yarn skein, place the beginning of the yarn over your pointer and middle fingers and hold it down with your thumb (middle photo).
Start wrapping the yarn around and around your fingers about 50 times (right photo).
Take your threaded needle you set aside and push it between and through your pointer and middle fingers on the left side of your work (left photo).
Bring the other side of the yarn back behind your work and through your fingers on the right side (middle photo).
With the yarn behind and on each side of your work, take both sides of the yarn and tie them together pulling them just snug enough to securely pull the work off of your fingers, but don’t knot the yarn yet (right photo).
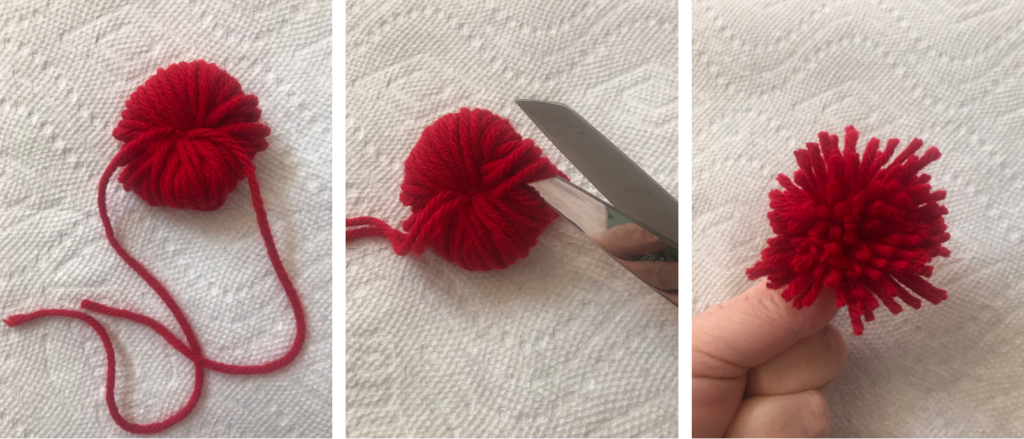
Once the work is off your fingers, continue to pull the sides of the yarn as tight as possible, without snapping the yarn, then tie in a knot (left photo).
Cut through all the loops on one side (middle photo), then the other side. Make sure not to cut the knotted yarn pieces.
The pom pom will be uneven once all the loops are cut (right photo).
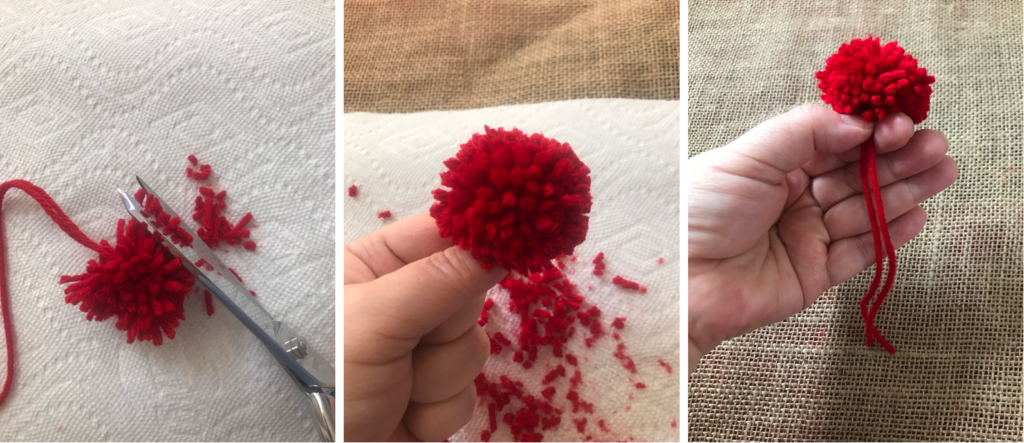
Start trimming the uneven strands of the pom pom (left photo).
Continue to trim until the pom pom forms a nice ball shape (middle photo).
Right photo shows a finished pom pom.
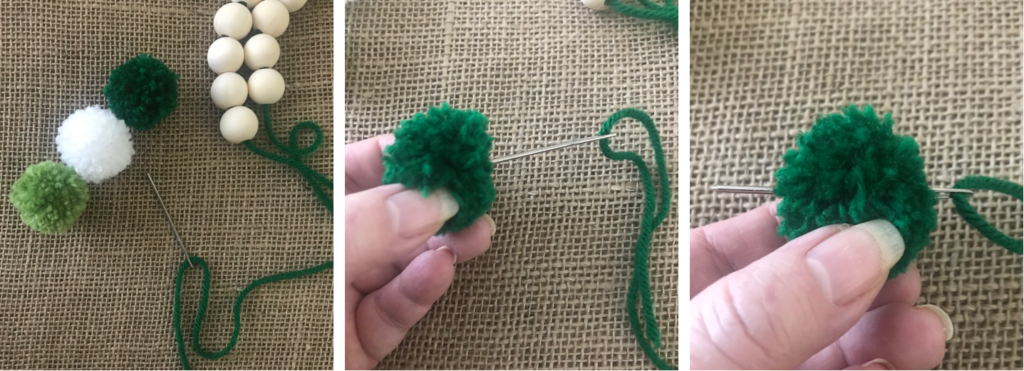
STRINGING POM POMS TO GARLAND
Thread your needle with one of the 16 1/2″ ends of the yarn from the bead strung garland (left photo).
With your first pom pom, push the threaded needle right through the middle of the pom pom (middle photo), and out the other side (right photo).
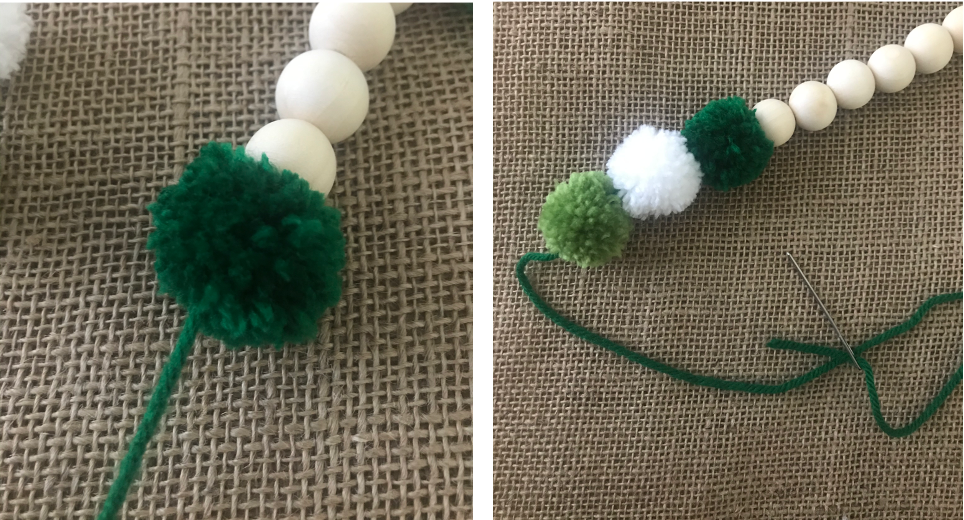
Push the pom pom up the yarn right under the wood bead (left photo).
String your other two pom poms right up under the first strung pom pom (right photo).
String your other set of three pom poms on the other side of the garland
MAKING TASSELS
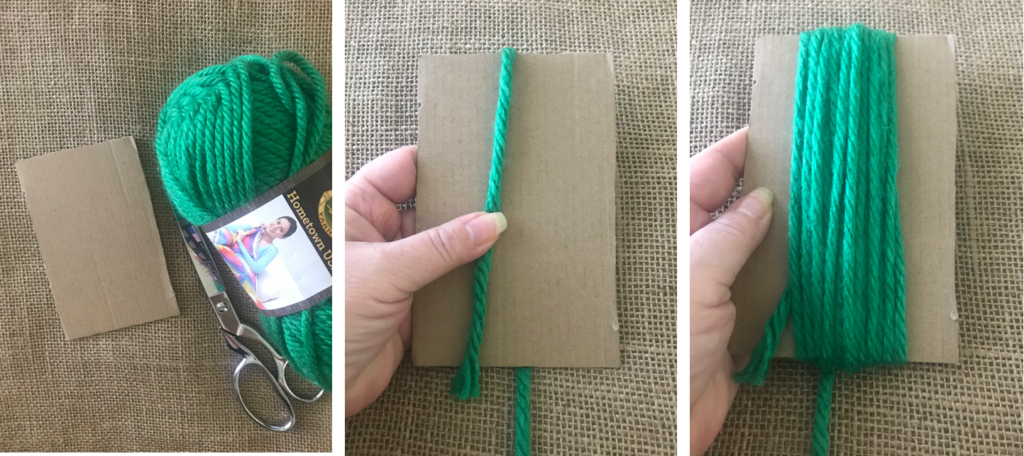
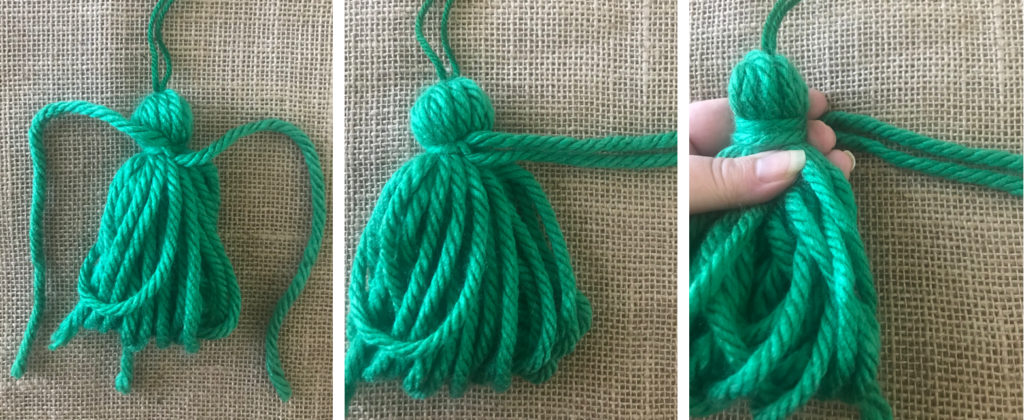
Cut a scrap piece of corrugated cardboard or thick piece of card stock about 3 1/2″ wide x 5 1/2″ tall.
Using the Hometown USA yarn in GREEN BAY, layout the skein of yarn in front of you, then drape the end of the yarn over the top of the cardboard, holding the yarn in place with your thumb (middle photo).
Wind the yarn around and around the cardboard, 10 times (right photo).
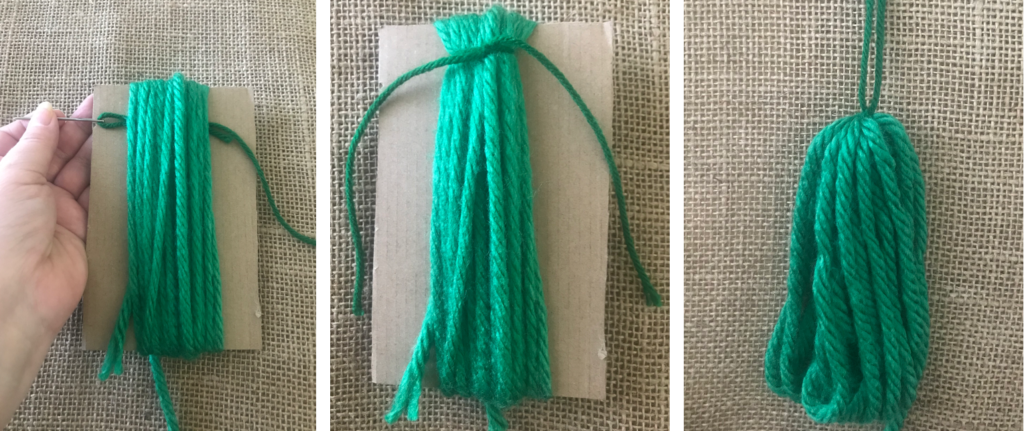
Cut a 12″ piece of yarn using the same color as the 90″ yarn you used to string the beads (PADDY GREEN).
Thread your needle with the 12″ yarn and insert the threaded needle between the cardboard and wound yarn on the frontside of your cardboard (left photo).
Pulling tightly, tie and then knot the piece of yarn holding the yarn securely together (middle photo).
Cut the bottom, ending piece of yarn from the skein, wiggle the wound and tied yarn off of the cardboard, then position the tied knot so it is now at the top (right photo).
Cut a 20″ piece of yarn the same color as the tassel you are making (GREEN BAY).
Place the piece of yarn behind the wound yarn keeping the previously knotted 12″ yarn at the top. Come down a bit from the top, then tightly tie and knot the 20″ piece of yarn, creating the top ball part of the tassel (left photo).
Pull the two strands of yarn you just tied to one side (middle photo).
Wrap the the two strands of yarn around 2 times ending on the backside of the tassel where you first knotted the 20″ yarn (right photo).
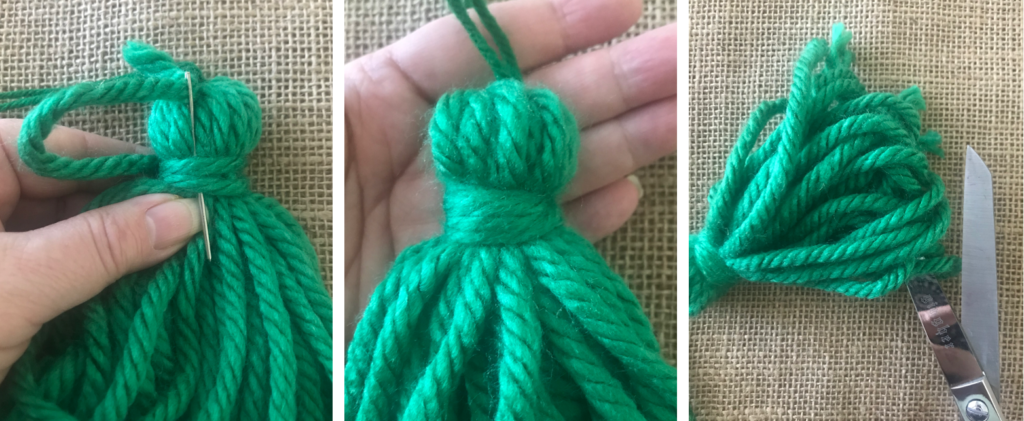
Thread your needle with one end of the yarn you just wrapped around.
On the backside of the tassel (where you tied the knot before wrapping), insert the threaded needle down through the wrapped section (left photo). Do the same with the other end of yarn.
From the front side of the tassel you can see the ball formed at the top with wrapped yarn securing it in place (middle photo).
You will now want to cut the bottom loops of the tassel (right photo).
Your tassel can be left as is (left photo), just trim and even up the bottom…
or you can give your tassels a crimped, fuller look by separating the individual strands of each yarn piece.
To fray the strands use your nail or end of your needle to separate each strand per yarn piece (middle & right photo).
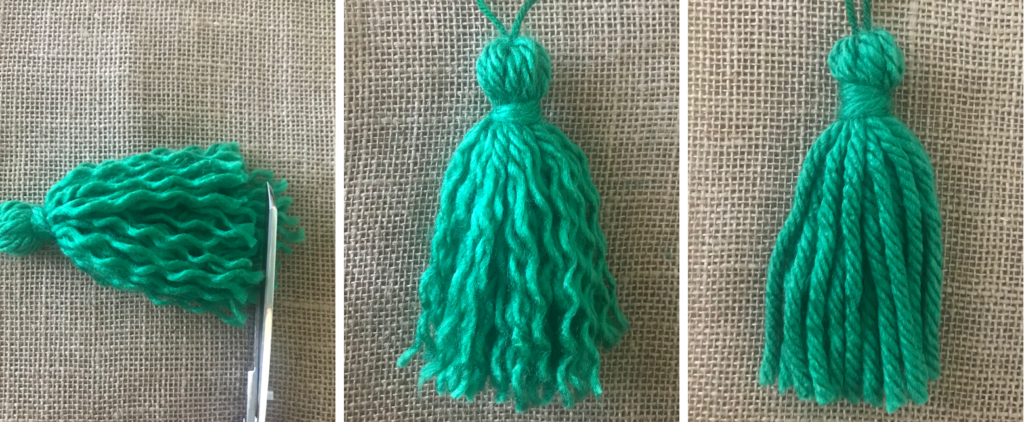
Repeat until all of the yarn pieces have been frayed.
Cut and trim the frayed strands at the bottom of the tassel to make the ends nice and even (left photo).
Middle photo shows a finished frayed tassel.
Right photo shows a finished standard tassel.
NOTE: my tassels are approximately 5 1/2″ long from the top of the ball to the bottom.
STRINGING TASSELS TO GARLAND
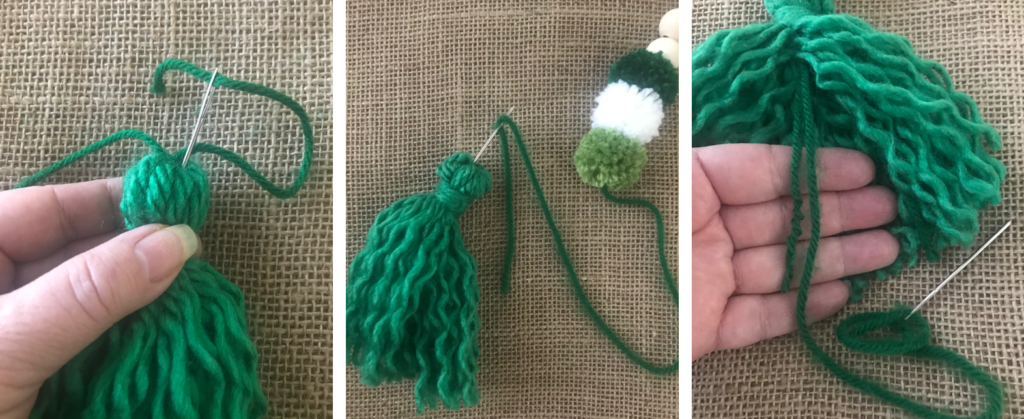
At the top of the tassel you still have the 12″ piece of yarn that you tied and knotted before you slipped the wound yarn off the cardboard.
Thread your needle with one of the ends of that yarn and insert your threaded needle straight down through the middle of the ball top of the tassel, down through the tassel yarn strands (left photo). Reach up the middle of the strands and find the needle and pull it through. (The yarn will blend in with the tassel strands). Do the same with the other end of the 12″ piece of yarn.
Next, thread your needle with one of the ends of the 90″ yarn that you used to string the beads and pom poms. Insert the threaded needle right in the middle of the ball top of the tassel (middle photo). Reach up the middle of the strands and find the needle and pull it through. Tighten up the beads and pom poms and synch the tassel snug up to the bottom of the last pom pom.
You now have the two yarn ends from the 12″ piece of yarn and one end of the 90″ yarn from the garland that you strung through the tassel ball top down in the middle of the tassel strands. Make sure the beads, pom poms and tassel are snug together with no gaps between on the 90″ yarn, then find the three ends of yarn strung between the tassel strands (right photo) and tie them together in a double knot. (Note- the right photo only shows two yarn ends but it should be three).
Cut the three yarn ends short enough so they hide among the strands and don’t stick out of the bottom of the tassel.
Repeat with the second tassel on the other end of the garland.
This St. Paddy’s Day Tassel & Pom Pom Wood Bead Garland is so fun and festive and adds the perfect touch to my Irish decor. I’m anxious to make one for Easter with pretty spring pastel colors. +=
Happy Creating!
Check It Out!
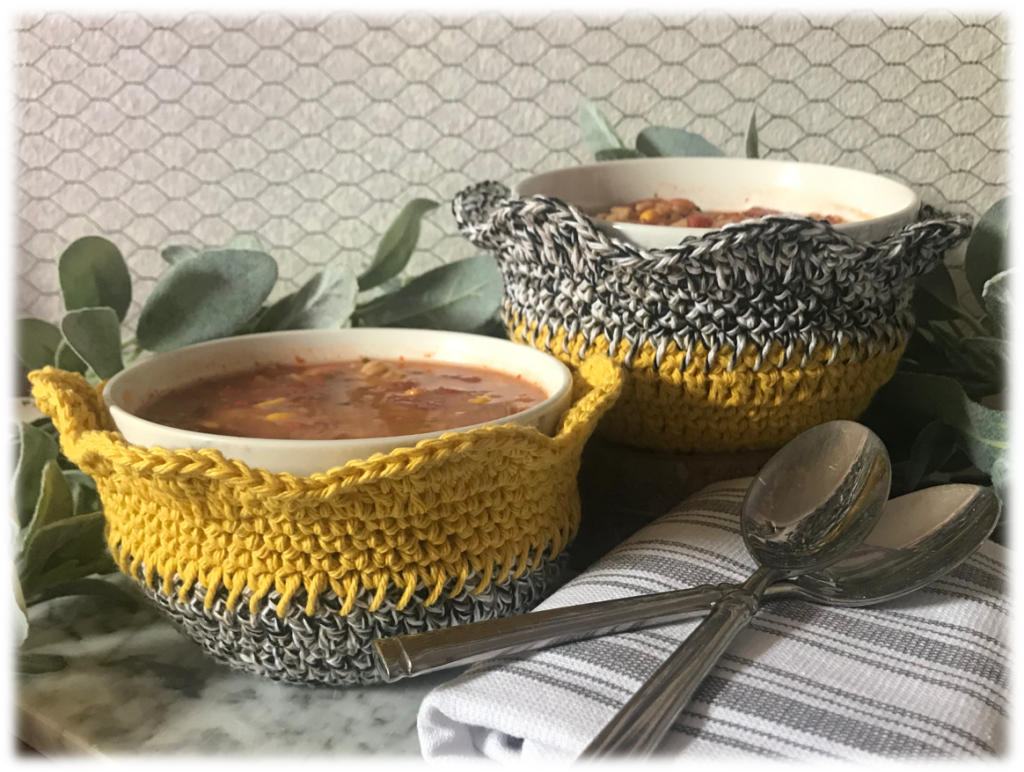
These Crochet Double Layered Bowl Cozies provide the perfect protection from extremely hot or really cold bowls. Find the free pattern here
BONUS soup recipe included with pattern!
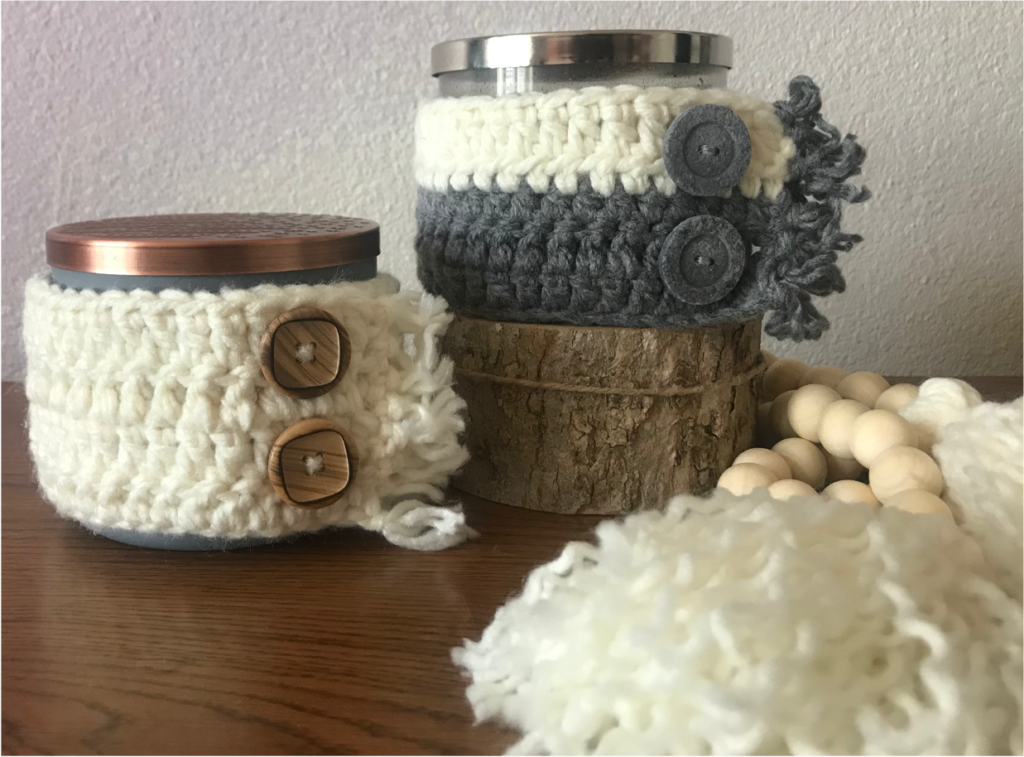
Dress up your 3-wick candles with a comfy cozy sweater-like Crochet Sweater Candle Cozy! Find the free pattern here
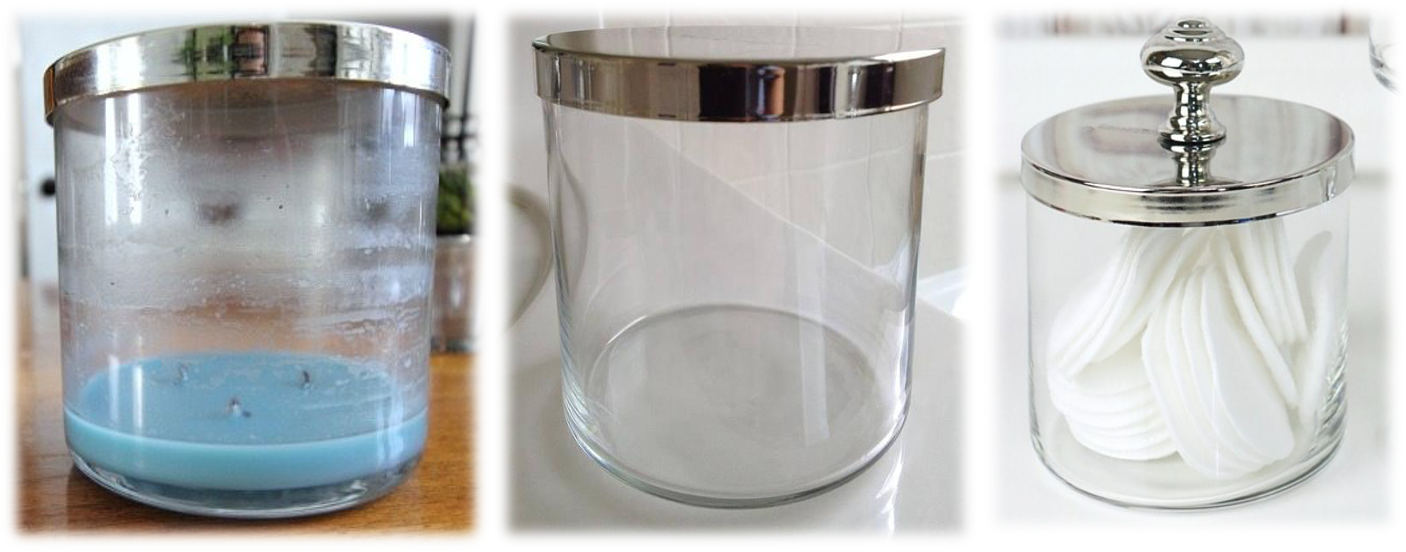
Utilize those used up candle jars! Just remove wax, clean and then repurpose them with these How To Clean and Repurpose Candle Jars directions here
Contact
I would love to hear from you! Feel free to leave me a comment below, use the ‘Contact Me’ section on the top menu bar and leave a comment there, or email me directly at mypassionatesoul123@gmail.com.
Subscribe
All subscribers welcome! If you would like to stay current and receive email updates with the latest My Passionate Soul news, alerts to new FREE patterns, exciting giveaway info and more, you can sign-up at the ‘Subscribe’ section of the sidebar menu. I promise you will never receive any spam, just yarn news and other crafty stuff!
***I put a lot of labor, love and time into the design of my patterns and create them for personal use only. Please do not sell my patterns and claim them as your own. Feel free to make and sell items you’ve made from my patterns, but if you do I ask that you link directly back to my post or blog and provide the link. You may also share my patterns on social media as long as you, again, link directly back to my post or blog and provide the link. Please do not copy and paste my patterns and claim them as your own. If selling items made from my patterns I ask that you use your own photos and do not re-publish any photos related to my patterns as your own. Thank you for your understanding.***


 +
+ =
=

Leave a Reply