FREE Printable Download

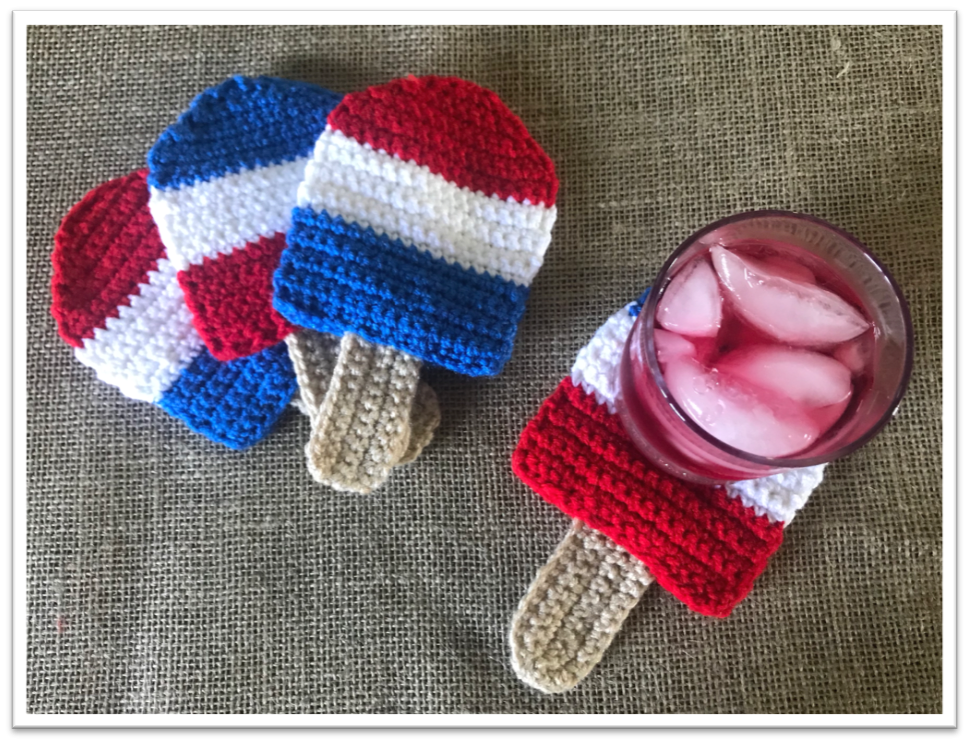
Here it is – my very first post on my blog! I love to create crochet projects that can be used to decorate my home, and I am excited to share this Crochet Banner/Coaster Set – Patriotic Popsicles pattern that I have created just in time for the July 4th holiday. This is the first in a series of banner/coaster sets that I will be sharing with you over the next several months. The versatility of this project gives you the option of making a fun banner to hang or a cute set of coasters, or both. This pattern can be used in so many different colors… I am imagining bright, summer colors light hot pink, lime green and yellow. And as always, my patterns will be free to you, my fellow crocheters and followers!
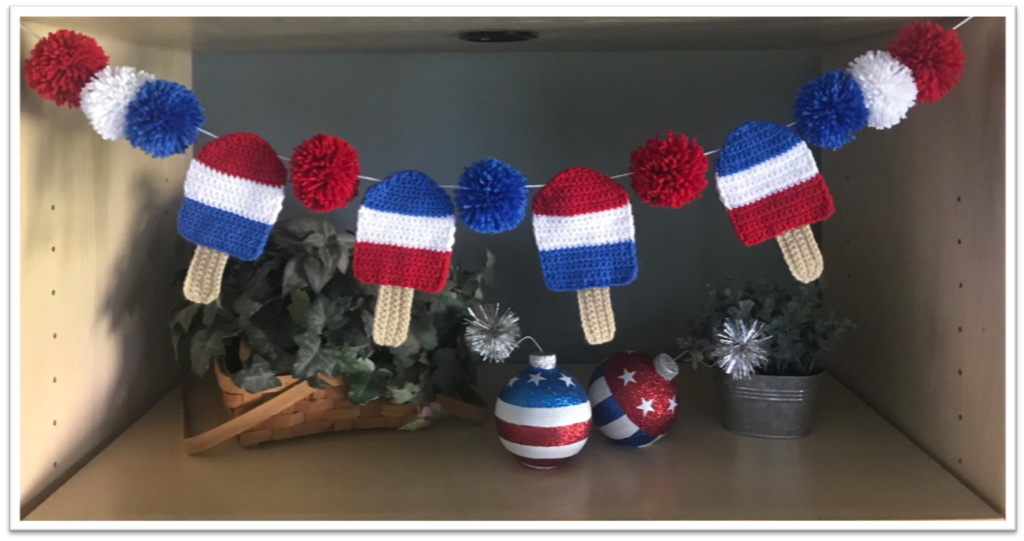
The yarn (string) I used for stringing and hanging the banner measures 65″ long. You can make it as long or as short as you like.
Popsicles measure 4″ W x 7 1/4″ H (including the popsicle stick)
Pom Poms measure approximately 3″ – 3 1/2″ W
SUPPLIES:
Size H/8-5.00MM Hook (for popsicles)
Size G/6-4.25MM Hook (for popsicle sticks)
Tapestry Needle
Worsted Weight Yarn – I used:
1 skein each Red Heart Super Saver yarn in Blue, Cherry Red and White (for popsicles and Pom Poms)
1 skein Red Heart Super Saver yarn in Buff (for popsicle sticks)
** If you are making a banner you will also need the following supplies:
Potato Masher (yes, I said potato masher! You will use this to make the Pom Poms. You can also use a slotted spatula)
Needle Nose Scissors (regular, large scissors work, but they are harder to work with when cutting through the Pom Poms)
ABBREVIATIONS:
SC – Single Crochet
HDC – Half Double Crochet
SC2TOG – Single Crochet Two Stitches Together (SC Decrease)
POPSICLE
Make 2 pieces for each popsicle for a total of 8 pieces/4 popsicles. (Note: you will only need 1 popsicle stick per 2 piece popsicle).
Start by choosing which color you want to be on the bottom and start with that color yarn – for my first and third popsicles I chose blue for the bottom, my second and fourth I started with red. Again, you will be making eight pieces for 4 popsicles.
Chain 17
Row 1: SC in 2nd chain from hook, then SC in each chain across to the end, chain 1, turn (you will now have rows of 16)
Row 2: SC in first stitch and in each stitch across to end, chain 1, turn.
Rows 3 – 8: SC in first stitch of the row and in each stitch across to end, chain 1, turn. In the last stitch of row 8 you will change yarn color before turning (I chose white for the middle of my popsicles), DO NOT chain 1, turn.
Row 9 – 15: With your new yarn color SC in first stitch and in each stitch across to end, chain 1, turn. In the last stitch of row 15 you will change to a third yarn color before turning (I chose red for the top of my first and third popsicles, and blue for the top of my second and fourth), DO NOT chain 1, turn.
Row 16-18: With your new yarn color SC in first stitch and in each stitch across to the end, chain 1, turn. In the last stitch of row 18, DO NOT chain 1, turn.
Row 19: SC2TOG first 2 stitches, SC 12 across, SC2TOG last two stitches, turn.
Row 20: SC2TOG first 2 stitches, SC 10 across, SC2TOG last two stitches, turn.
Row 21: SC2TOG first 2 stitches, SC 8 across, SC2TOG last two stitches, turn.
Row 22: SC2TOG first 2 stitches, SC 6 across, SC2TOG last two stitches, turn.
Row 23: SC2TOG first 2 stitches, SC 4 across, SC2TOG last two stitches, turn.
Row 24: SC2TOG first 2 stitches, HDC 2 across, SC2TOG last two stitches.
Tie off and weave in any loose tails
POPSICLE STICK
Chain 15
Row 1: SC in 2nd chain from hook, then SC in each chain across to the end, chain 1, turn (you will now have rows of 14)
Rows 2 – 6: SC in first stitch and in each stitch across to end, chain 1, turn. In the last stitch of row 6, tie off leaving a fairly long tail.
Thread your tapestry needle with the tail and weave up through the popsicle stick. Give the tail a tug to round out the corner of the stick. Weave through to the other side and do the same. Cut off any remaining tail.
ASSEMBLY
To assemble each popsicle take two matching popsicle pieces and one popsicle stick. Secure the popsicle stick to the back popsicle piece with 2 or 3 stitches.
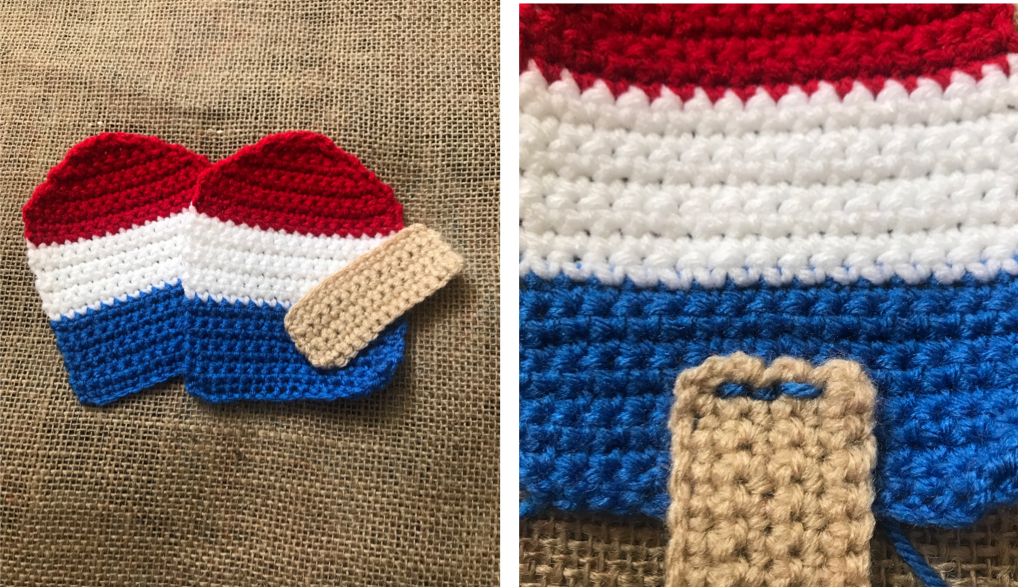
Take the second popsicle piece and place it on top of the back popsicle piece and popsicle stick. Line the front and back pieces up evenly.
Secure the two pieces together by stitching along the inside edge starting at the bottom and with the coordinating color of yarn. While stitching the two pieces together, change the yarn color where necessary.
Tie off and weave in any loose tails.
**If you are making coasters, you are done here! If you are making a banner follow the instructions below for making pom poms and stringing your banner.
POM POMS
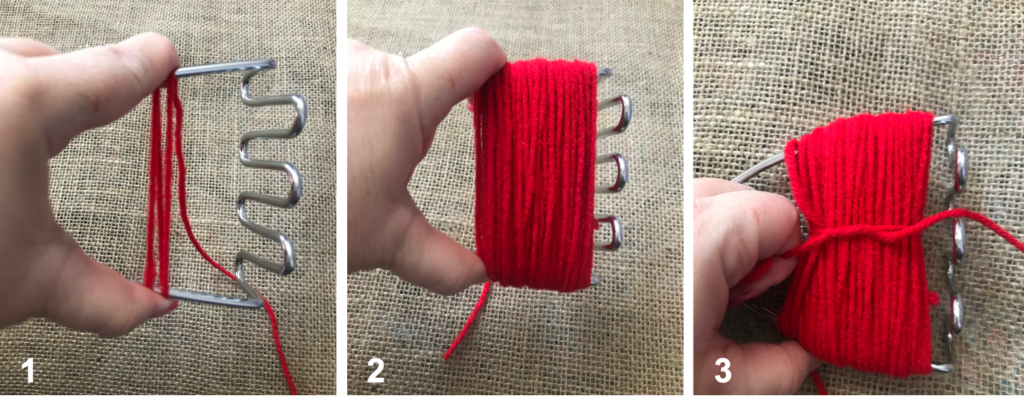
1 – hold the yarn securely to the masher with your thumb and index finger.
2 – Wrap the yarn around and around to desired thickness. I wrapped mine 100 times for each pom pom.
3 – Cut a piece of yarn long enough to tie the pom pom together. Place it on the back side of the wrapped yarn and pull the ends up through each side of the wrapped yarn. Tie together and pull as tightly as you can without snapping the yarn.
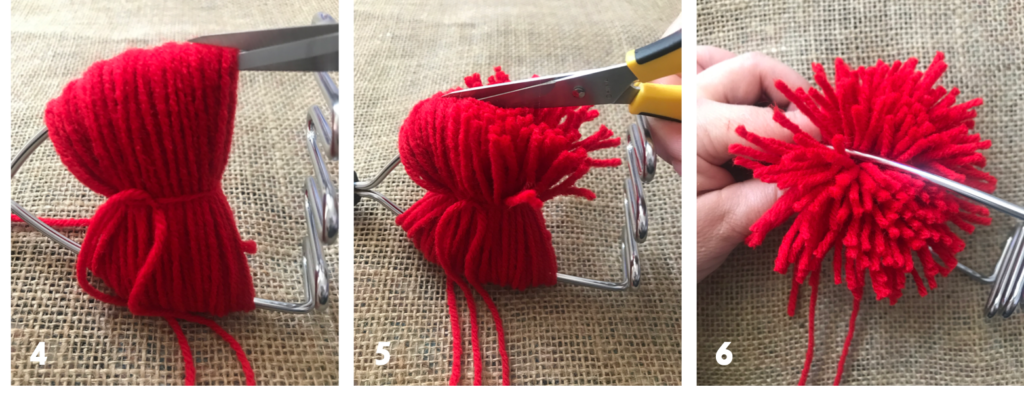
4 & 5 – Cut through all the loops on one side of the wrapped yarn and then turn and cut though all the loops on the other side.
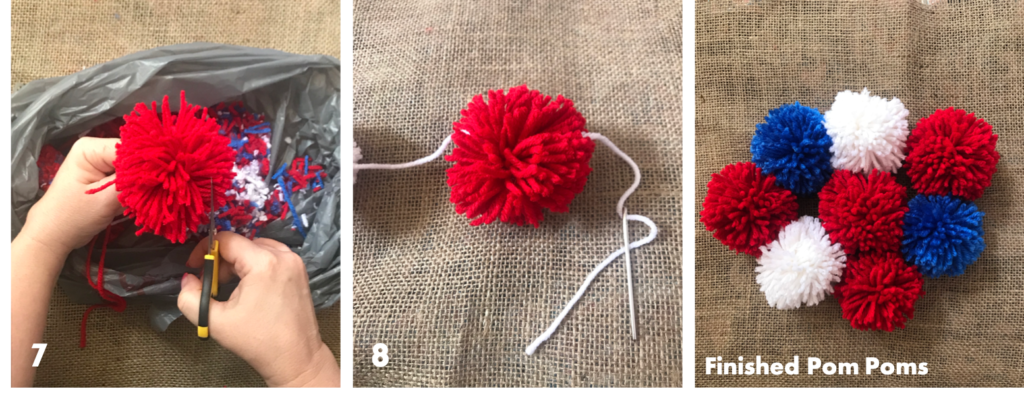
6 & 7 – once you cut the pom pom away from the potato masher you will have a stringy looking pom pom. Trim the edges even all the way around for a much prettier look. This makes a big mess so make sure to do your trimming over a plastic bag for easy clean up.
8 – When stringing the pom poms, first thread your tapestry needle with the 65″ hanging string (or whatever length you chose), then push your threaded needle through the center of the pom pom and pull through the other side. The pom pom should stay securely on the string and can easily be moved for perfect placement.
STRINGING YOUR POM POMS AND POPSICLES
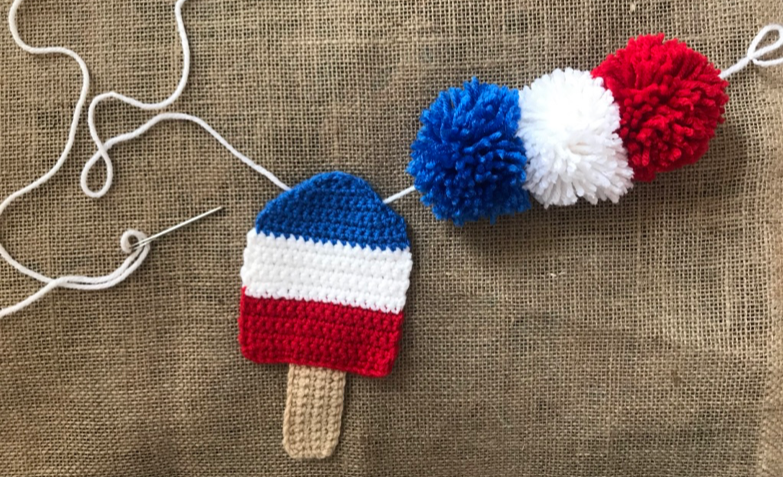
I always lay my pieces out first in the order I want them to be on the string. For this Crochet Banner/Coaster Set – Patriotic Popsicles I did my stringing from right to left. Start with the farthest piece on the right side and string that piece first. If you are following the banner picture shown above the farthest piece on the right is a red pom pom, then white, then blue, then a popsicle, etc. See the pom pom #8 instructions just above for pom pom stringing directions.
To string the popsicles hold it with the popsicle stick pointing down. At the top of the popsicle and about the second row down, find a small opening at the right side edge and push your threaded tapestry needle through to the other side.
Continue stringing pom poms and popsicles until they are all secure on the hanging yarn. You can rearrange them once the banner is hung where you want it.
Woohoo, You’re done! I hope you have enjoyed making my Crochet Banner/Coaster Set – Patriotic Popsicles as much as I enjoyed creating this pattern.
Contact Me
I would love to hear from you so please feel free to leave a comment below, or visit my Contact Me page and send me an email. I'll be on Pinterest, Facebook and Instagram soon!
Thanks for stopping by!

***I put a lot of labor and love into my patterns and create them for personal use only. You may not sell my patterns and claim them as your own. You may, however, make and sell items you've made from my patterns, but if you do I ask that you link directly back to my post or blog and provide the link. You may share my patterns on social media as long as you link directly back to my post or blog and provide the link. You may not copy and paste my patterns and claim them as your own. If selling items made from my patterns you must use your own photos and cannot re-publish any photos related to my patterns as your own.***
Leave a Reply