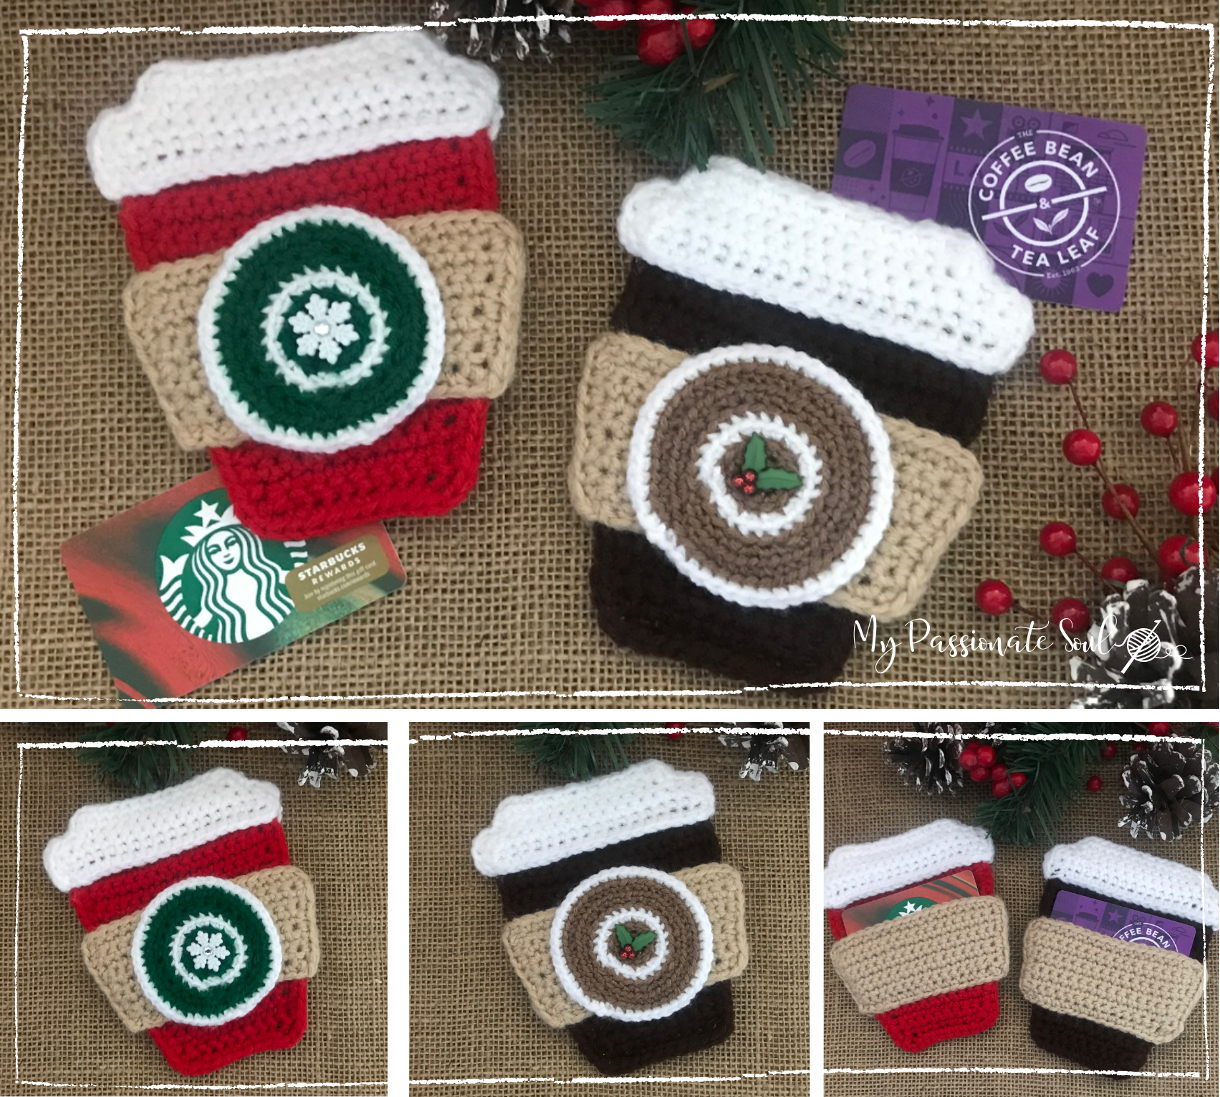
Crochet Coffee Cup Gift Card Holder

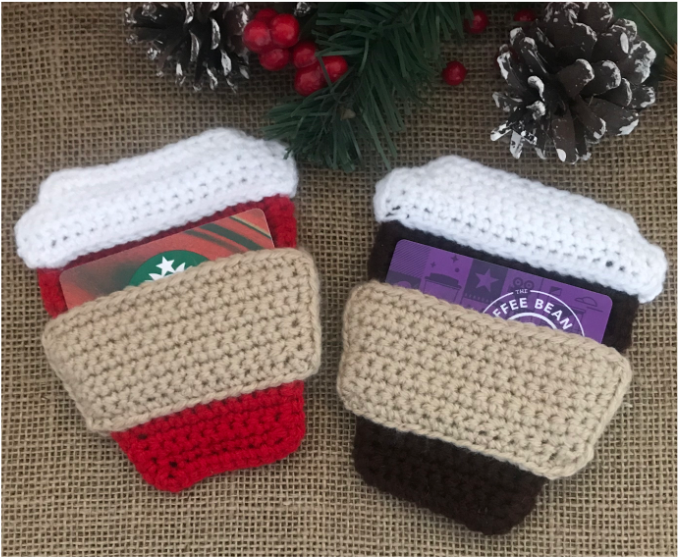
New on the blog! These Crochet Coffee Cup Gift Card Holders are too cute not to make several for you gift giving this season. The pattern is FREE here on the blog and has Easy-to-Follow instructions with lots of photos. Check out the inspiration for these gift card holders and find the pattern below.
INSPIRATION
I am one of those people that has their Christmas shopping list made and has already started shopping before it’s even Thanksgiving. I always have a few people on my list that I buy gift cards for; my Bunco ladies, neighbors, party hostesses and my family stockings. Coffee house gift cards just might be the most popular gift cards of the season and Starbucks is always my go-to card. I even keep a few on hand for those unexpected “I need a quick gift” that seem to pop-up year after year.
When the new Starbucks holiday cups came out this season the idea for these adorable coffee cup gift card holders came to mind! Who wouldn’t want to get a Starbucks, Coffee Bean and Tea Leaf, Peet’s Coffee or Dutch Bros Coffee gift card in this totally cute holder. You can even add a hanging string at the top and make a 2-in-1 gift turning this gift card holder into an ornament too!!
CROCHET SKILL LEVEL
EASY
The pattern for this crochet coffee cup gift card holder is an easy level pattern that uses basic repetitive single crochet stitches and simple back loop work and finishing.
PROJECT MATERIALS
YARN - for these crochet gift card holders I used:
Red Heart Super Saver Yarn in CHERRY RED, COFFEE
Medium 4 / 100% Acrylic/ 364 yrds
Partial Skein each color – (2 coffee cup panels each)
Red Heart Super Saver Yarn in BUFF
Medium 4 / 100% Acrylic/ 364
Partial Skein – (2 coffee cup sleeves each)
Red Heart Super Saver Yarn in WHITE
Medium 4 / 100% Acrylic/ 364
Partial Skein – (2 coffee cup lids & 1 logo each)
Red Heart Super Saver Yarn in PADDY GREEN, CAFE LATTE
Medium 4 / 100% Acrylic/ 364
Partial Skein – (1 coffee cup logo each)
Find this yarn at joanns.com
CROCHET HOOK(S)
H/8-5.00MM and F/5-3.75MM
ADDITIONAL NOTIONS
Fabric Glue (I used Aleene’s Original Tacky Glue)
Novelty Button(s)
Scissors
Sewing Pins
Tapestry Needle
Find Aleene’s Tacky Glue at joanns.com
Find Novelty Buttons at joanns.com
PROJECT MEASUREMENTS
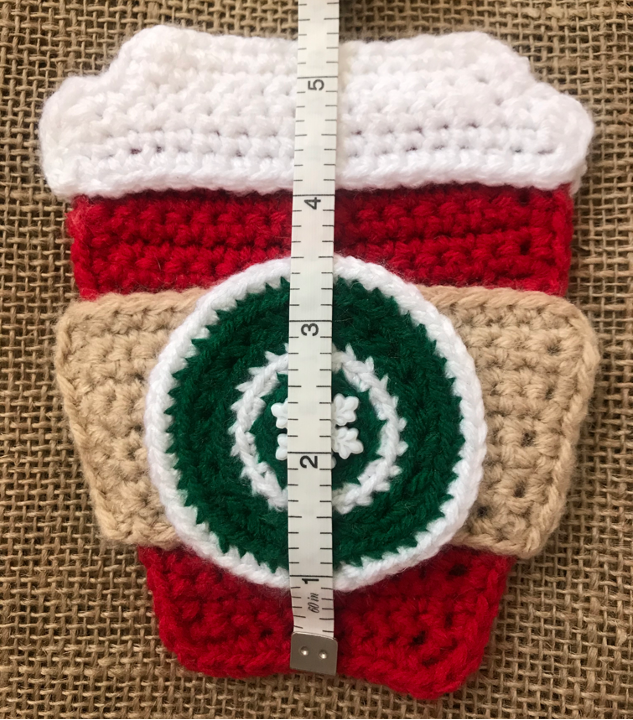
Coffee cup measures approximately 5 1/4″ tall from bottom to top.
Coffee cup measures approximately 4 1/2″ across.
CROCHET ABBREVIATIONS (US terms)
blo – back loops only
ch – chain
sc – single crochet
sl st – slip stitch
st/sts – stitch/stitches
Pattern - CROCHET COFFEE CUP GIFT CARD HOLDER
Add Your Heading Text Here
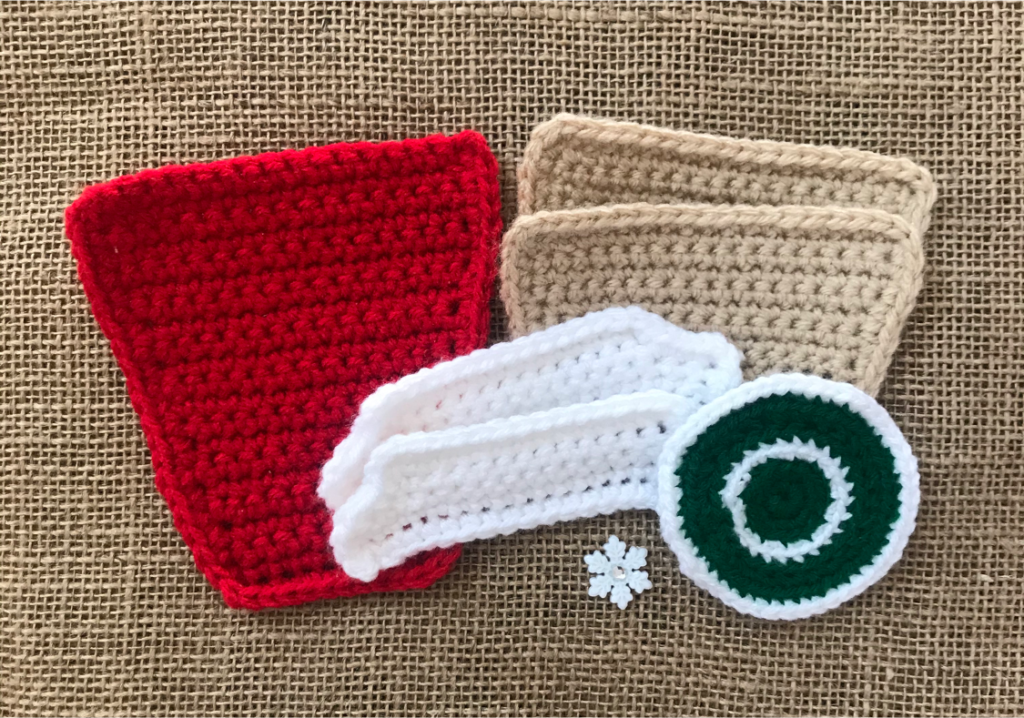
CROCHET COFFEE CUP PANELS (Make 1)
Add Your Heading Text Here
Yarn of your choice and H hook
Ch 11
Row 1 – sc 1 in the second chain from the hook, sc 1 in each stitch across, ch 1, turn (10)
Rows 2 – 4 – sc 1 in each st across, ch 1, turn (10)
Row 5 – sc 2 in the first st, sc 1 in the next 8 sts, sc 2 in the last st, ch 1, turn (12)
Rows 6 – 9 – sc 1 in each st across, ch 1, turn (12)
Row 10 – sc 2 in the first st, sc 1 in the next 10 sts, sc 2 in the last st, ch 1, turn (14)
Rows 11 – 13 – sc 1 in each st across, ch 1, turn (14)
Row 14 – sc 2 in the first st, sc 1 in the next 12 sts, sc 2 in the last st, ch 1, turn (16)
Rows 15 – 18 – sc 1 in each st across, ch 1, turn (16)
Row 19 – sc 1 in each st across (16)
Tie off and weave in tails
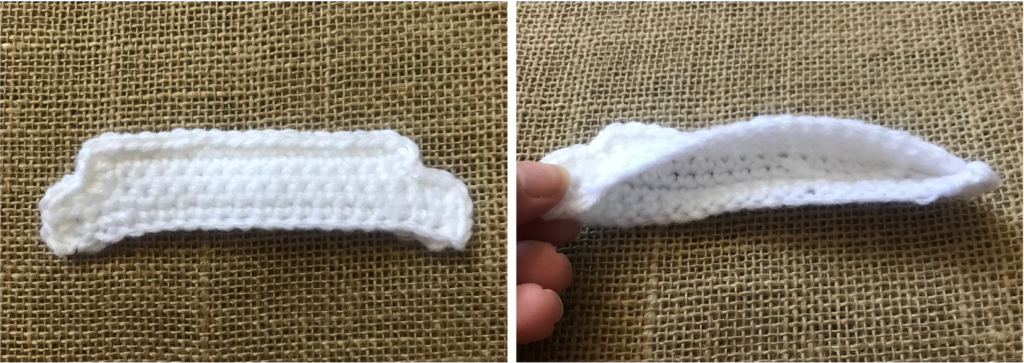
**For a more finished look, make a sc edging along the sides and bottom edges of the coffee cup panel (see photo below for sc edge stitch placement). Make 2 sc in each bottom corner to make the rounding more defined.
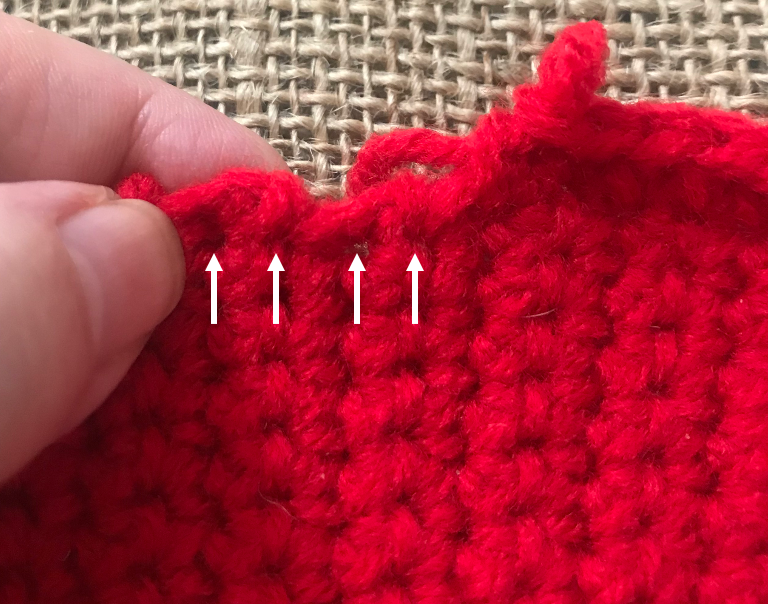
This photo shows 1 coffee cup panel without the sc edging and 1 panel with the edging (left photo).
Tie off and weave in tails
Add Your Heading Text Here
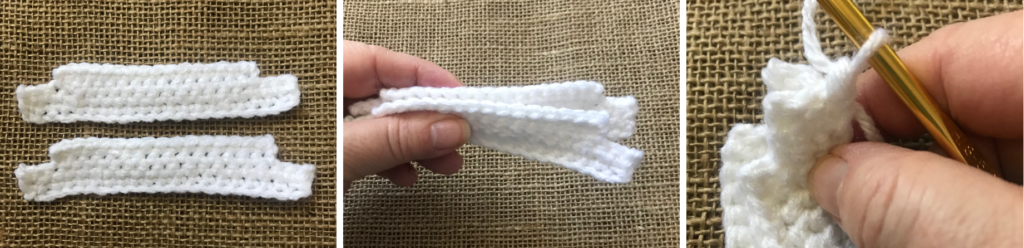
CROCHET COFFEE CUP LID (Make 2)
WHITE yarn and H hook
PIECE 1
ch 21
Row 1 – sc 1 in the second ch from hook, sc 1 in each st across, ch 1, turn (20)
Row 2 – sc 1 in each st across (20)
Tie off and weave in tails
PIECE 2
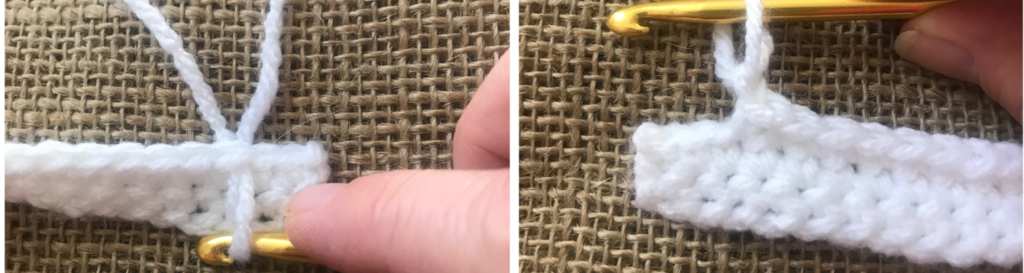
NOTE: Piece 2 will be joined to Piece 1
Row 1 – starting from the right side of Piece 1, skip the first 2 sts, in the 3rd st pull through the new yarn (white) – (left photo), ch 1, sc 1 across 15 sts, ch 1, turn (16)
**The last 2 sts of Piece 1 will be left alone (right photo).
Row 2 – sc 1 in each st across (16)
Tie off and weave in tails
Add Your Heading Text Here
Now that Piece 1 & 2 are joined you will have sharp looking edges (left photo).
To soften the edges, take both coffee cup lids and line them up, one on top of the other, with wrong sides together (middle photo).
Starting from the right side bottom corner pull new yarn (white) through both lined-up set of stitches, ch 1 and sc 1 in that same space (right photo).
Add Your Heading Text Here
Continue to sc 1 in both sets of lined up stitches, up the right side, across the top and down the left side. NOTE: Make 2 sc in the corners to make the rounding more defined (left photo).
Sc 2 in the last left side set of sts, tie off and weave in tails. DO NOT sc across the bottom. This will be left open to slip lid down over coffee cup top (right photo).
Tie off and weave in tails
Add Your Heading Text Here
CROCHET COFFEE CUP SLEEVE (Make 2)
BUFF yarn and H hook
ch 19
Row 1 – sc 1 in the second ch from hook, sc 1 in each st across, ch 1, turn (18)
Rows 2 – 4 – sc 1 in each st across, ch 1, turn (18)
Row 5 – sc 2 in the first st, sc 1 in the next 16 sts, sc 2 in the last st, ch 1, turn (20)
Rows 6 – 8 – sc 1 in each st across, ch 1, turn (20)
Row 9 – sc 1 in each st across (20)
Tie off and weave in tails
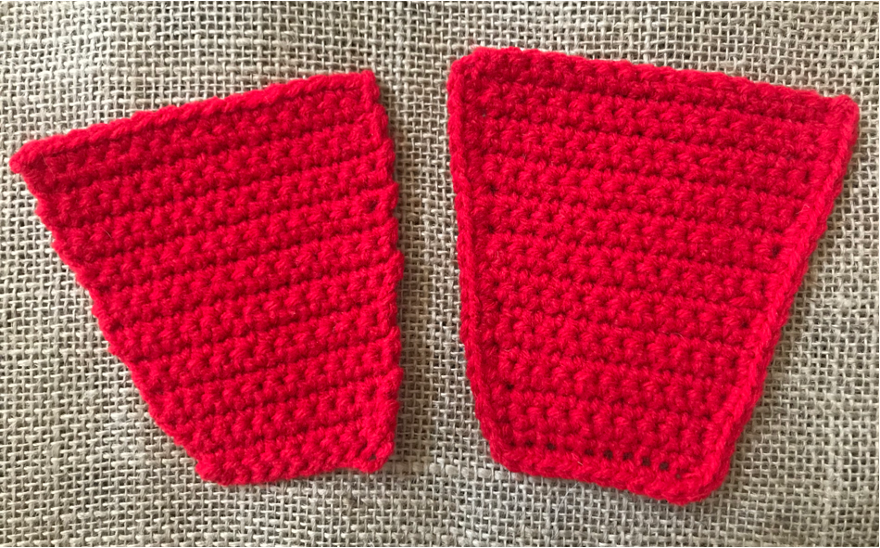
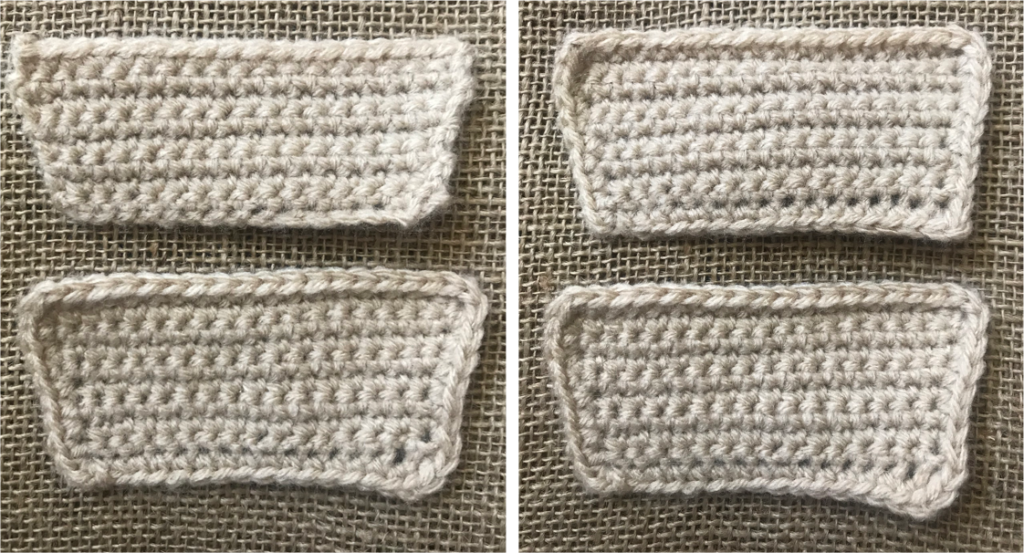
Sc the outer edges of both coffee cup sleeve pieces just as you did with the coffee cup panel and both lids pieces.
MAKE 3 sc in the corners to make the rounding more squared.
The photo below shows 1 coffee cup sleeve without the sc edging and 1 sleeve with the edging (left photo).
Add Your Heading Text Here
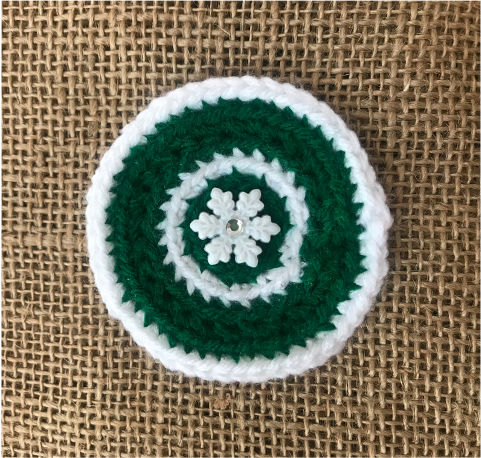
CROCHET FAUX LOGO CIRCLE (Make 1)
PADDY GREEN or CAFE LATTE yarn and F Hook
NOTE: the PADDY GREEN OR CAFE LATTE yarn (depending on whether you’re making a red or brown coffee cup) will be used for magic ring and Rounds 2, 4 and 5
WHITE yarn
NOTE: WHITE yarn will be used for Rounds 3 and 6
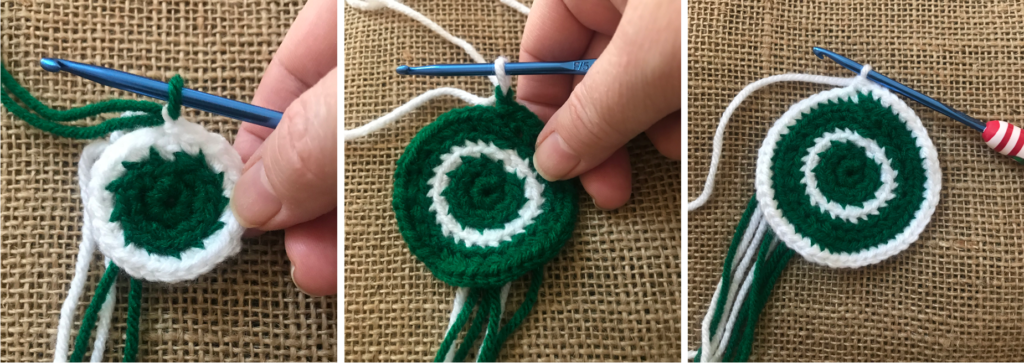
Beginning Round – with paddy green or cafe latte yarn make a magic ring and sc 6 into ring, pull yarn tail to tighten up ring, sl st to join, ch 1
Round 2 – sc 2 in each stitch around, sl st to join (12)
Round 3 – pull through new yarn (white) – this will count as ch 1, IN BACK LOOPS ONLY (blo), sc 2 in each st around, sl st to join in blo (24)
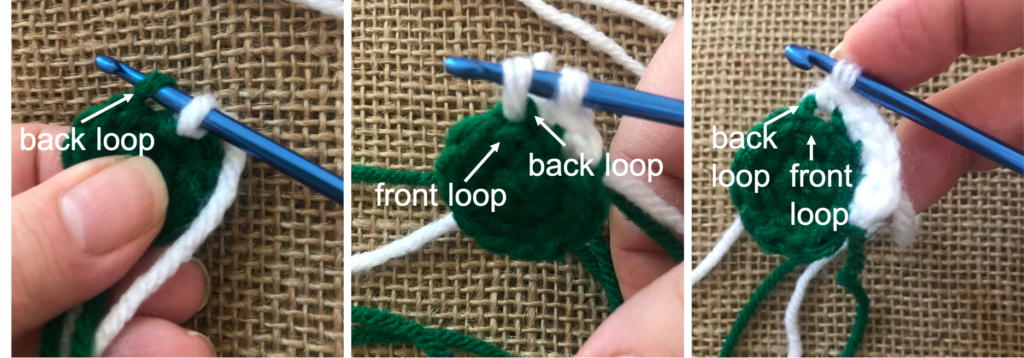
Add Your Heading Text Here
**Cut the paddy green or cafe latte yarn that finished Round 2 leaving just enough tail to weave in. The yarn is now free from the stitching and can be used to pull through for Round 4
Round 4 – with Round 3 finished, pull through paddy green or cafe latte yarn (left photo), continuing in blo, sc 1 in each st around, sl st to join in blo, ch 1 (24)
Round 5 – still in blo, sc 2 in each st around, sl st to join in blo (48) – (middle photo)
NOTE: if you are using CAFE LATTE yarn, it is a little thinner than the paddy green yarn, so I added an extra round of cafe latte for this faux logo circle
For the extra cafe latte round, in the blo, sc 1 in each st around, sl st to join in blo (48)
**Cut the white yarn that finished Round 3 leaving just enough tail to weave in. The yarn is now free from the stitching and can be used to pull through for Round 6
Round 6 – pull through white yarn, still in blo sc 1 in each st around, sl st through both loops to join (48) – (right photo)
Tie off and weave in all tails
Add Your Heading Text Here
CROCHET COFFEE CUP GIFT CARD HOLDER
ASSEMBLY
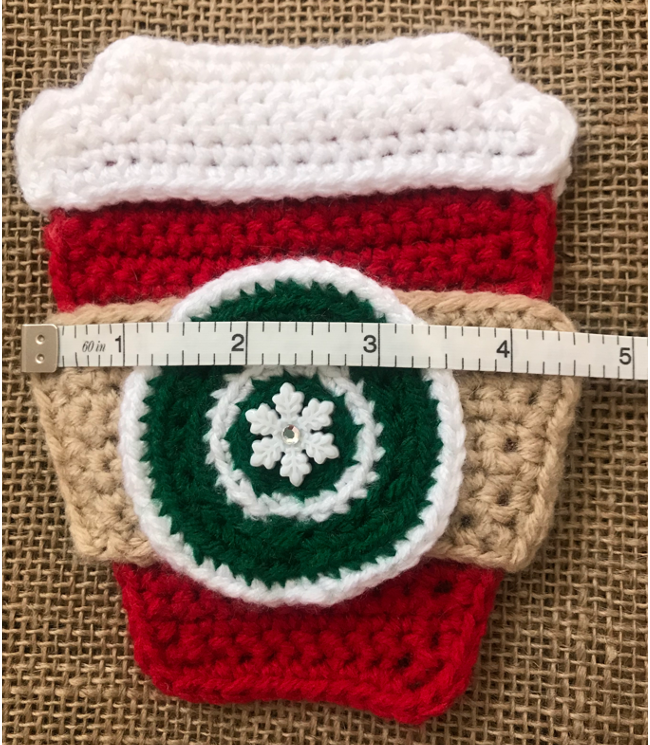
Attaching Novelty Button to Faux Logo Circle
Sew or glue your novelty button to the center of the faux logo circle.
My snowflake button did not have a back loop for sewing so I had to glue it on.
Add Your Heading Text Here
Stitching Faux Logo Circle to Coffee Cup Sleeve
Center your faux logo circle to the coffee cup sleeve and pin it in place. Thread your tapestry needle with paddy green or cafe latte yarn and come up from behind the sleeve and circle to begin stitching the two together (left photo).
Stitch all the way around the middle of the circle securing it to the sleeve. From the backside of sleeve, tie your two tails in a knot (middle photo). Weave in tails.
Finished logo attached to sleeve (right photo).

Add Your Heading Text Here
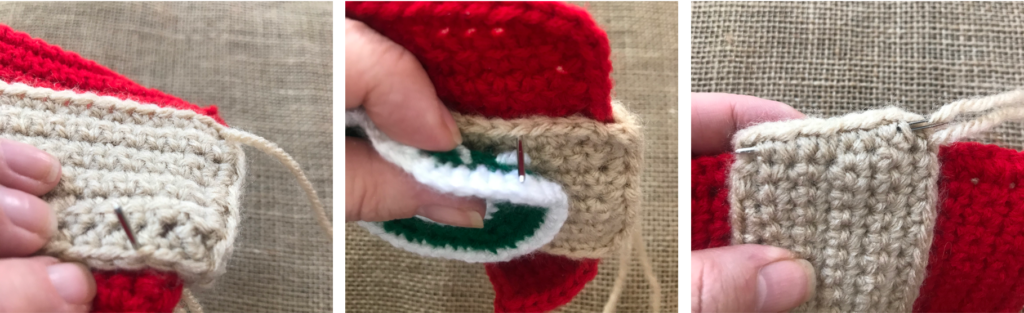
Stitching Coffee Cup Sleeves to Coffee Cup
Coming up about 1 1/8″ from the bottom of the coffee cup, take both coffee cup sleeves and place the one with the logo circle on the frontside of the coffee cup and the other sleeve behind the coffee cup. With the frontside facing you, line up the left side of sleeve edges together, just outside the edge of the coffee cup and pin the sleeves together (left photo).
Thread your tapestry needle with buff yarn and begin stitching the left side of the two sleeves together. Make sure you don’t go through the coffee cup while you’re stitching, you want to stitch the sleeve edges only (middle photo).
Once you have finished stitching the left side of the sleeves together (right photo) and before you continue stitching the bottom side of the sleeves together, gently pull the right side of the sleeves out over the edge of the coffee cup and pin the sleeve edges in place just like you did for the left side of the sleeves.
Add Your Heading Text Here
Begin stitching the bottom of the sleeves together, this time going through the coffee cup too, stitching all three pieces together (left photo).
As your needle comes through the frontside, make sure to curl up the edge of the logo circle so it doesn’t get stitched down with buff yarn (middle photo).
Continue stitching up the right side of the sleeves, making sure not to go through the coffee cup while stitching this side.
NOTE: you will not be stitching the top part of the sleeves to the coffee cup. The top of the backside sleeve will be left open because this is where the gift card will slip into.
To finish off the stitching, weave your tails through all of the side stitching (right photo), then cut off any remaining tail.
Because you do not want any buff yarn stitches showing through the backside, you will want to glue the top of the frontside sleeve to the coffee cup.
Add Your Heading Text Here
This photo shows how the gift card fits down into the top of the backside sleeve.
Add Your Heading Text Here
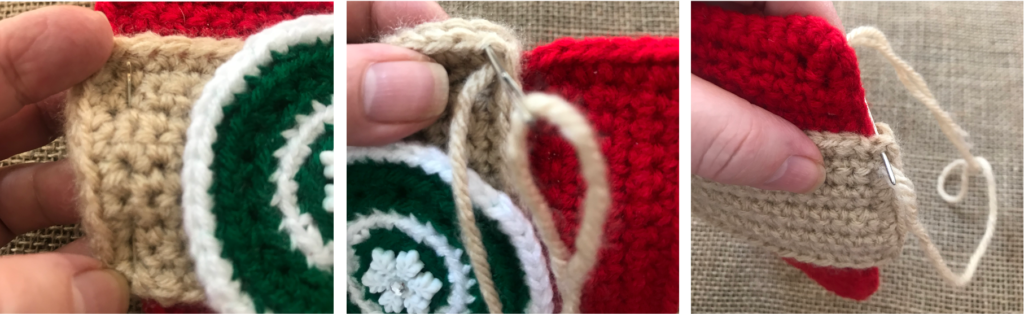
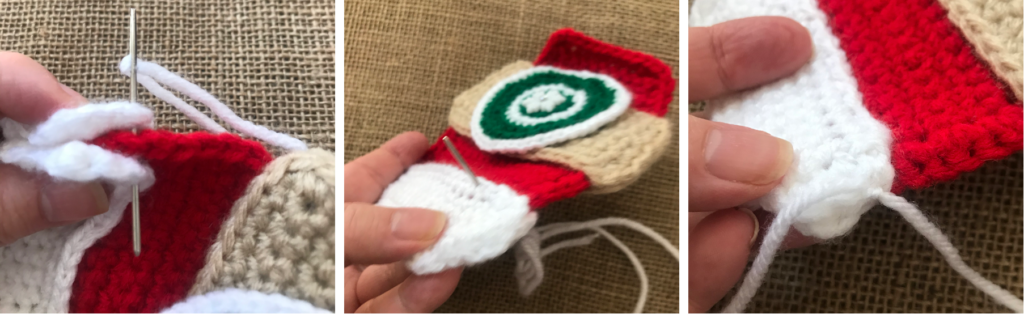
Stitching Coffee Cup Lids to Coffee Cup
Take both coffee cup lids and coming down about 3/4″ from the top of the coffee cup place one on the frontside of the cup and one on the backside. Pin the lids in place together.
With the frontside of the coffee cup facing you, line up the right side edges of the lids together, just outside the edge of the coffee cup, and begin stitching through the lid and coffee cup edges together (left photo).
Continue stitching up on over and across the top of the lids and down the left side of the lid edges.
Stitch across the bottom of the lids going through the coffee cup so that you are stitching through all three pieces (middle photo).
Once you have finished the bottom edge stitching both tails should be at the same right side end. Tie them together in a knot and then weave in tails.
Add Your Heading Text Here
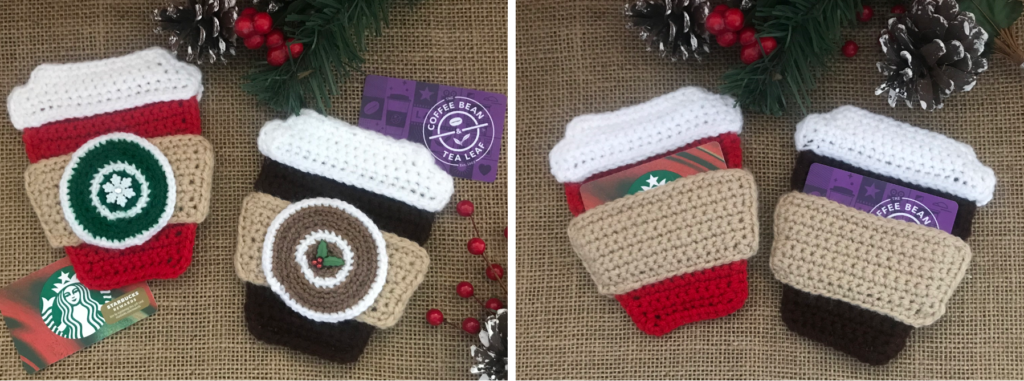
Gift giving never looked cuter! How many of these adorable Crochet Coffee Cup Gift Card Holders will you make this year?
Happy Creating!

Add Your Heading Text Here
Check It Out!
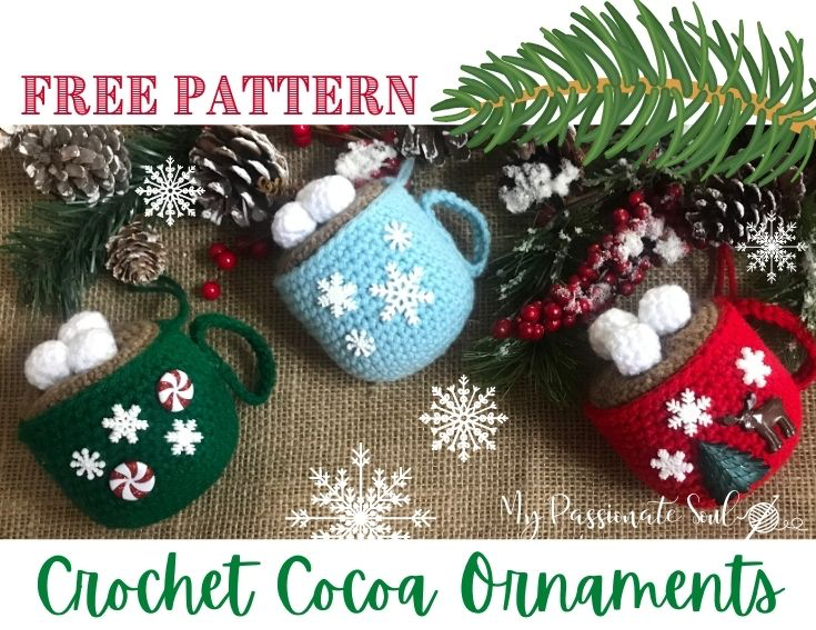
These Crochet Cocoa Ornaments are too cute to resist! Make 1, 2 or several with the free pattern found here
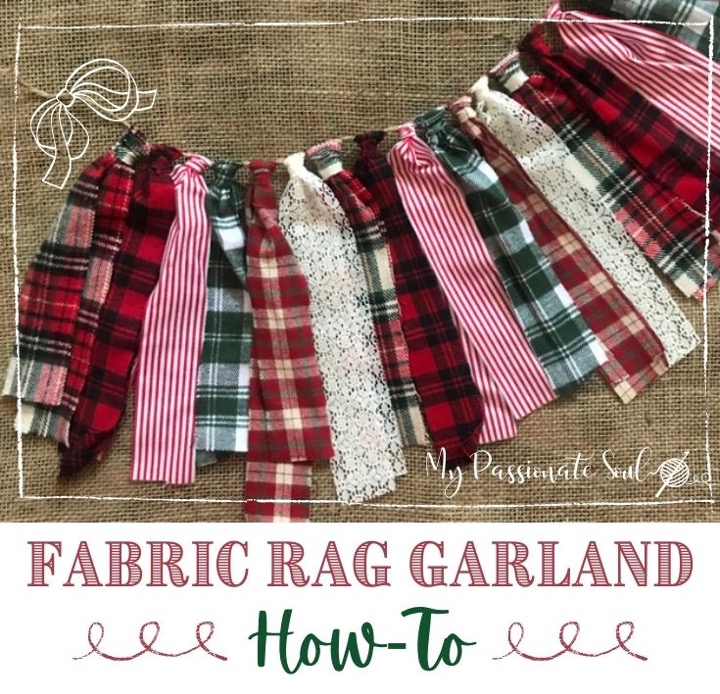
Give your holiday decor a warm and cozy feel with this Fabric Rag Garland made with flannel strips! Check out the complete How-To instructions here
kljkljlklklkj
Contact
I would love to hear from you! Feel free to leave me a comment below, use the ‘Contact Me’ section on the top menu bar and leave a comment there, or email me directly at mypassionatesoul123@gmail.com.
Subscribe
All subscribers welcome! If you would like to stay current and receive email updates with the latest My Passionate Soul news, alerts to new FREE patterns, exciting giveaway info and more, you can sign-up at the ‘Subscribe’ section of the sidebar menu. I promise you will never receive any spam, just yarn news and other crafty stuff!
***I put a lot of labor, love and time into the design of my patterns and create them for personal use only. Please do not sell my patterns and claim them as your own. Feel free to make and sell items you’ve made from my patterns, but if you do I ask that you link directly back to my post or blog and provide the link. You may also share my patterns on social media as long as you, again, link directly back to my post or blog and provide the link. Please do not copy and paste my patterns and claim them as your own. If selling items made from my patterns I ask that you use your own photos and do not re-publish any photos related to my patterns as your own. Thank you for your understanding.***
Leave a Reply