Crochet Cocoa Ornaments

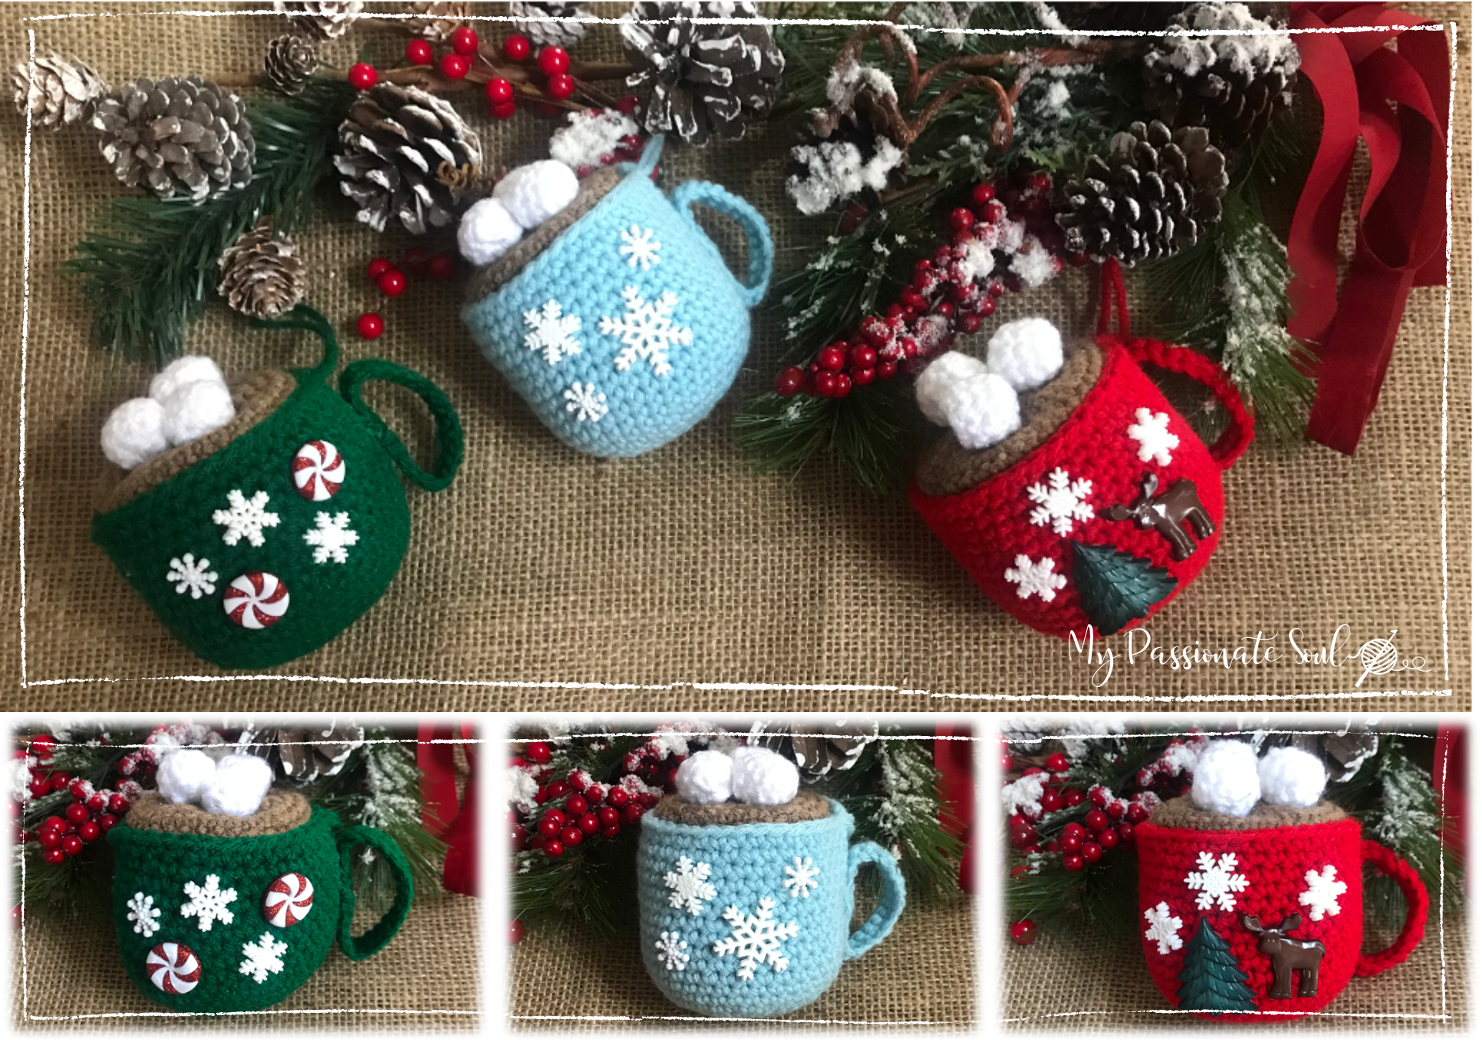
These Crochet Cocoa Ornaments are just so darn cute and are simple to make. The pattern is offered FREE here on the blog and includes EASY instructions with lots of photos for visual guidance. The marshmallows and holiday button embellishments make these cocoa ornaments extra cute! Check out the inspiration for these ornaments and find the pattern below.
INSPIRATION
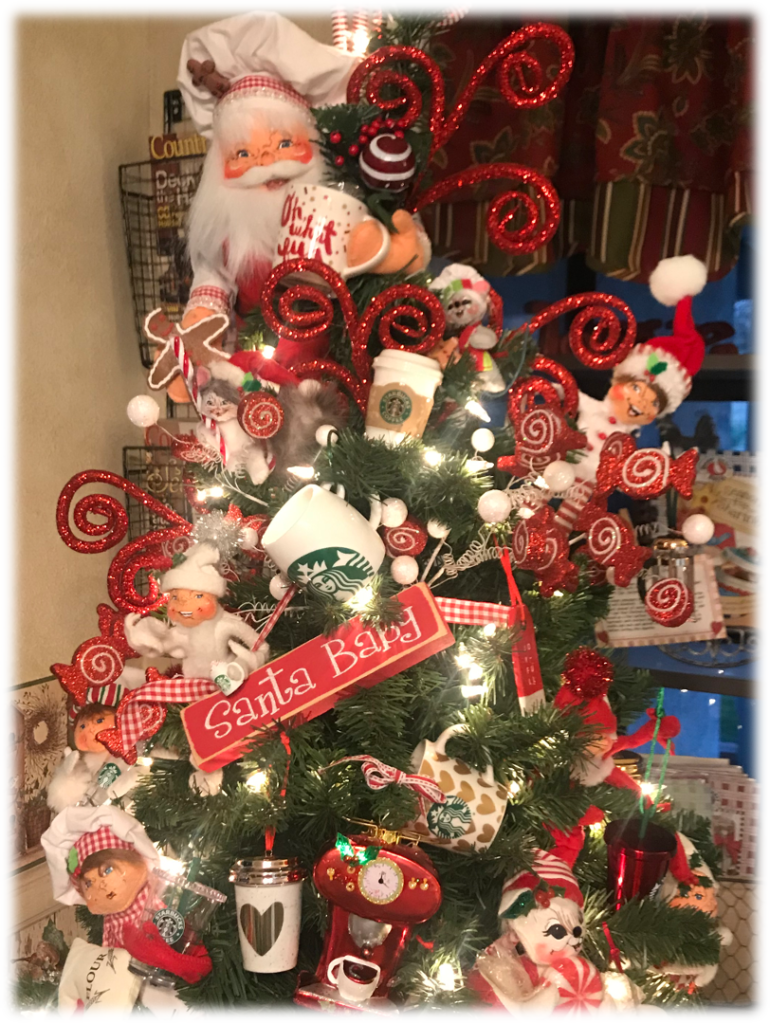
Christmas, it’s the most wonderful time of the year! In our family we have so many traditions that have been made over the years, and of course, trimming the tree is one of them. Or I should say, trimming the trees. Not only do I put up the main tree in the living room each year, but I also have 4 smaller trees that I put up in various rooms of the house. My absolute favorite tree though, is the 6 ft. coffee/cocoa/peppermint candy themed tree that sits in my kitchen. I adorn it with the several Starbucks ornaments that I’ve collected over the years, plus coffee, cocoa, and red and white candy ornaments, and a handful of jolly elves. At the top of the tree sits a Santa Claus holding a coffee cup… so cute!! I usually add 1 or 2 new ornaments to this tree every year, and I decided that this year homemade crochet ornaments would be perfect. So, I created the pattern for these Crochet Cocoa Ornaments with my kitchen tree in mind. Make 1, 2 or several. They make cute hostess, co-worker, neighbor and teacher gifts, and they are especially cute tied to the front of a holiday wrapped gift. Don’t forget to make 1 or 2 for yourself!
This tree is my inspiration for these adorable Crochet Cocoa Ornaments! I call this tree my Starbucks tree because it started out as a mini tree that sat on my kitchen counter and held about 5 or 6 Starbucks ornaments. 10 years later it has grown into this 6 ft. tree of pure fun. I can’t wait to put it up this year and add my cocoa ornaments!
CROCHET SKILL LEVEL
EASY
The pattern for these crochet cocoa ornaments is an easy level pattern that uses basic repetitive single crochet stitches with two single crochet decrease rounds and simple finishing.
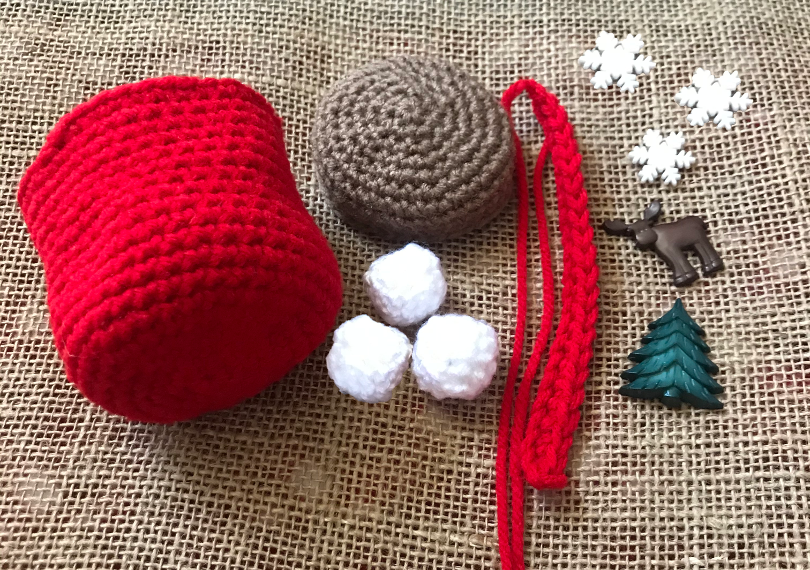
PROJECT MATERIALS
YARN - for these crochet cocoa ornaments I used:
Red Heart Super Saver Yarn in CHERRY RED, PADDY GREEN, LIGHT BLUE
Medium 4 / 100% Acrylic/ 364 yrds
Partial Skein each color – (1 cocoa mug with handle per color)
Red Heart Super Saver Yarn in CAFE
Medium 4 / 100% Acrylic/ 364
Partial Skein – (cocoa at top of each mug)
Red Heart Super Saver Yarn in WHITE
Medium 4 / 100% Acrylic/ 364
Partial Skein – (marshmallows)
Find this yarn at joanns.com
CROCHET HOOK(S)
H/8-5.00MM and F/5-3.75MM
ADDITIONAL NOTIONS
Novelty Holiday Buttons
Fabric Glue (I used Aleene’s Original Tacky Glue)
Fiberfill Stuffing
Scissors
Tapestry Needle
Wire Cutters
Find Novelty Buttons at joanns.com
Find Aleene’s Tacky Glue at joanns.com
Find Fiberfill Stuffing at joanns.com
PROJECT MEASUREMENTS
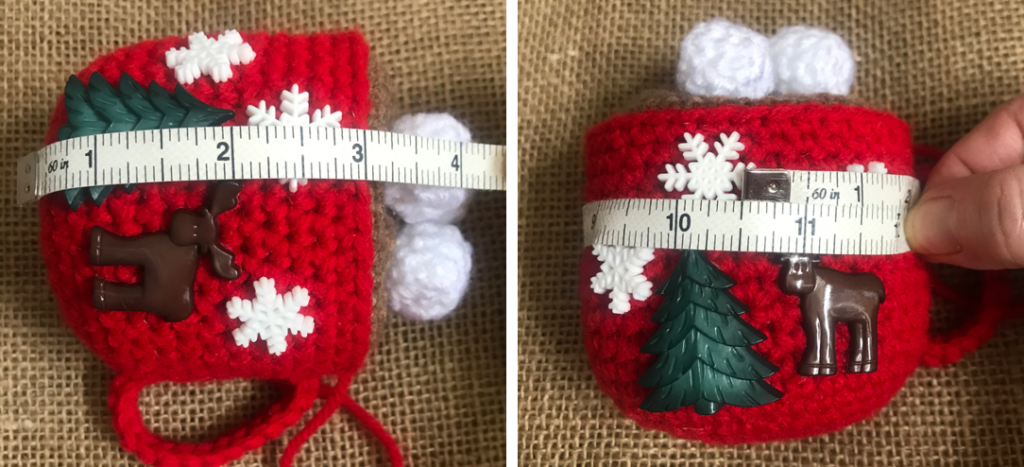
These crochet cocoa ornaments measure approximately 4″ tall from bottom of mug to top of marshmallows.
The crochet cocoa ornaments measure approximately 10 1/2″ round.
CROCHET PATTERN ABBREVIATIONS (US terms)
ch – chain
sc – single crochet
sc dec – single crochet decrease (two side-by-side stitches together)
sl st – slip stitch
sm – stitch marker
st/sts – stitch/stitches
Pattern - CROCHET COCOA ORNAMENTS
Add Your Heading Text Here
Yarn of your choice and H hook -
Note: there will be no slip stitch or chain 1 at the end of each round
Beginning Round – make a magic ring and sc 6 into ring, pull yarn tail to tighten up ring
Round 2 – sc 2 in each stitch around, place stitch marker (sm) in last stitch made, pull tail again to close ring tighter (12)
Round 3 – *sc 2 in the next st, sc 1 in the next*- repeat x 4, sc 2 in the next st, remove sm, sc 1 in that space, return sm in last stitch made (18)
Round 4 – sc 1 in the next st, *sc 2 in the next st, sc 1 in next 2 sts*- repeat x 4, sc 2 in the next st, remove sm, sc 1 in that space, return sm in last stitch made (24)
Round 5 – *sc 2 in the next st, sc 1 in next 3 sts*- repeat x 4, sc 2 in the next st, sc 1 in next 2, remove sm, sc 1 in that space, return sm in last stitch made (30)
Round 6 – sc 1 in the next 3 sts, *sc 2 in the next st, sc 1 in next 4 sts*- repeat x 4, sc 2 in next st, remove sm, sc 1 in that space, return sm in last stitch made (36)
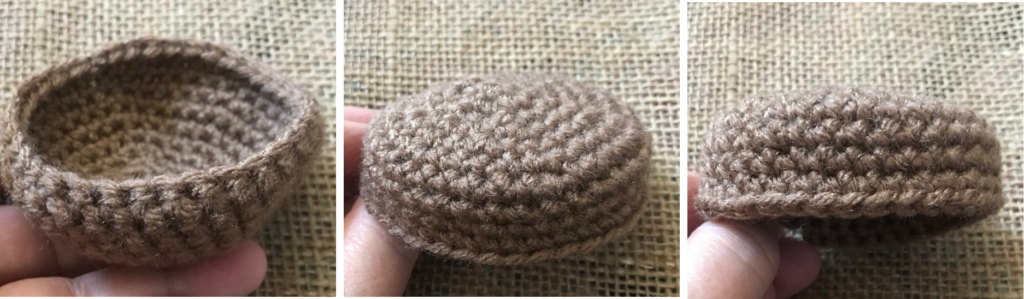
BOTTOM OF CROCHET COCOA ORNAMENTS
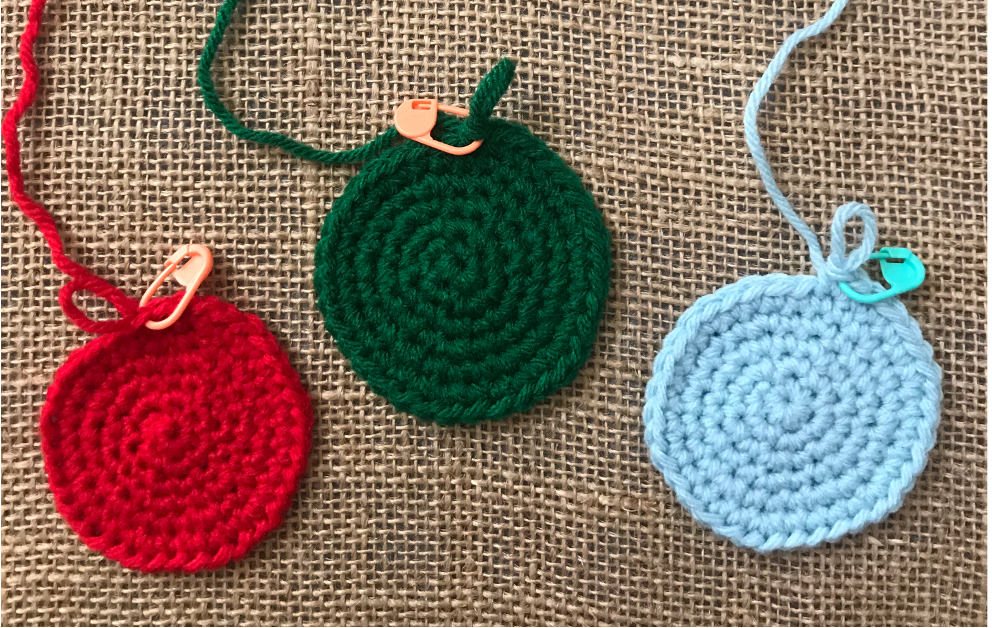
Once the bottom of the cocoa mug is finished, weave in the magic ring tail that was made at the beginning round.
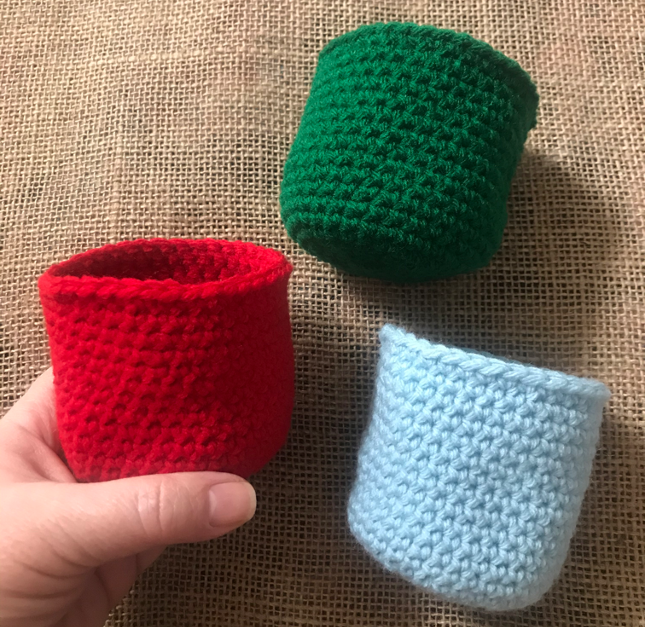
Rounds 7 – 11 – sc 1 in each stitch around, remove sm, sc 1 in that space, return sm in last stitch made (36)
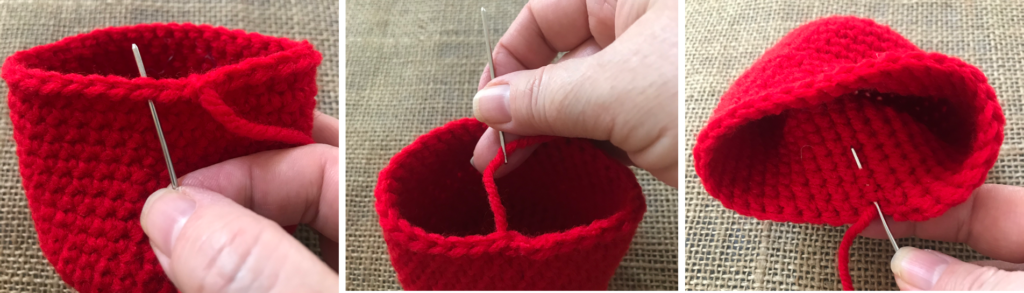
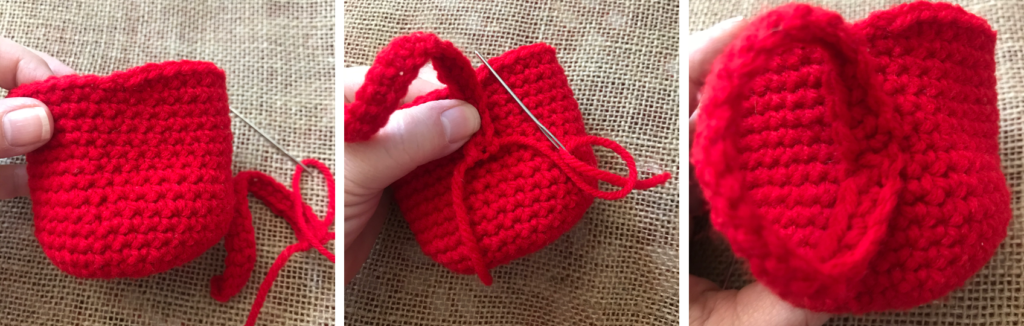
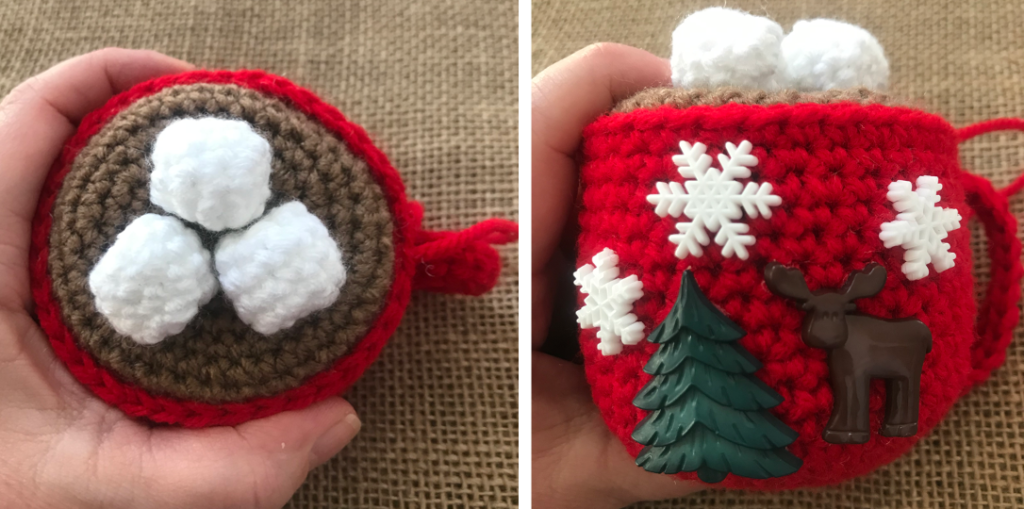
**The walls of the mug will start to curl up (left photo). Turn your work inside out and continue your rounds from this point (right photo).

Rounds 12 – 20 – sc 1 in each stitch around, remove sm, sc 1 in that space, sl st to join (36)
Cut yarn leaving a tail, tie off
Thread your tapestry needle with the join tail, skip the next stitch and insert needle in the 2nd st (left photo). Pull the join tail all the way through (middle photo), then weave in tail (right photo).
Add Your Heading Text Here
CUP OF CROCHET COCOA ORNAMENTS
Add Your Heading Text Here
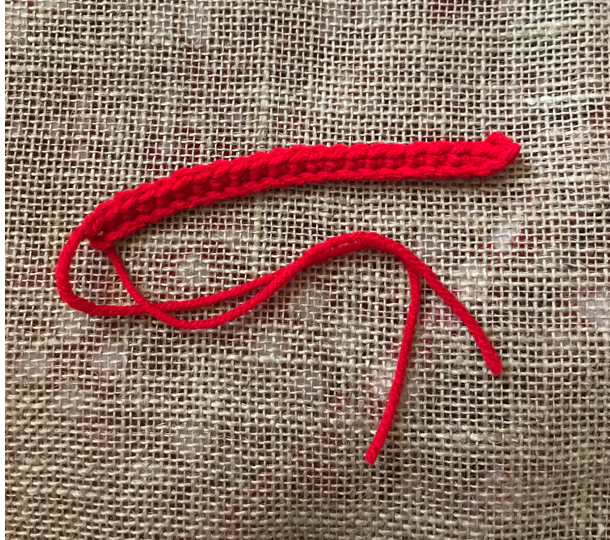
HANDLE FOR CROCHET MUG
Using same yarn color as mug and H hook -
ch 23
sc 1 in the second ch from hook, sc 1 in every stitch across (22)
Tie off but do not weave in tails. They will be used for stitching during assembly.
Add Your Heading Text Here
COCOA AT TOP OF CROCHET MUG
Using CAFE yarn and H hook -
Note: there will be no slip stitch or chain 1 at the end of each round
Beginning Round – make a magic ring and sc 6 into ring, pull yarn tail to tighten up ring
Round 2 – sc 2 in each stitch around, place stitch marker (sm) in last stitch made, pull tail again to close ring tighter (12)
Round 3 – *sc 2 in the next st, sc 1 in the next*- repeat x 4, sc 2 in the next st, remove sm, sc 1 in that space, return sm in last stitch made (18)
Round 4 – sc 1 in the next st, *sc 2 in the next st, sc 1 in next 2 sts*- repeat x 4, sc 2 in the next st, remove sm, sc 1 in that space, return sm in last stitch made (24)
Round 5 – *sc 2 in the next st, sc 1 in next 3 sts*- repeat x 4, sc 2 in the next st, sc 1 in next 2, remove sm, sc 1 in that space, return sm in last stitch made (30)
Round 6 – sc 1 in next 3 sts, *sc 2 in the next st, sc 1 in next 4 sts*- repeat x 4, sc 2 in next st, remove sm, sc 1 in that space, return sm in last stitch made (36)
Rounds 7 – 10 – sc 1 in each stitch around, remove sm, sc 1 in that space, return sm in last stitch made (36)
Tie off and weave in beginning magic ring tail and finishing tail
**When the cocoa round is finished the sides will be curled up (left photo).
Turn the work inside out and shape the last three rows down so the piece looks like a cap (middle and right photos).
Add Your Heading Text Here
COCOA MARSHMALLOWS (Make 3)
Using WHITE yarn and F hook -
Note: there will be no slip stitch or chain 1 at the end of each round
Beginning Round – make a magic ring and sc 5 into ring, pull yarn tail to tighten up ring
Round 2 – sc 2 in each stitch around, place stitch marker (sm) in last stitch made, pull tail again to close ring tighter (10)
Rounds 3 – 4 – sc 1 in each stitch around, remove sm, sc 1 in that space, return sm in last stitch made (10)
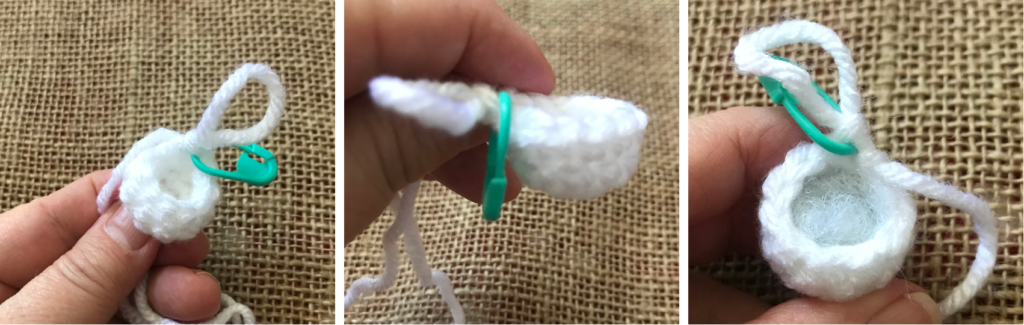
**The sides will curl up as you are working (left photo). Turn work inside out and continue rounds from this point (middle photo).
**Tuck beginning magic ring tail down into work and then stuff marshmallow with a pinch of fiberfill stuffing (right photo).
Add Your Heading Text Here
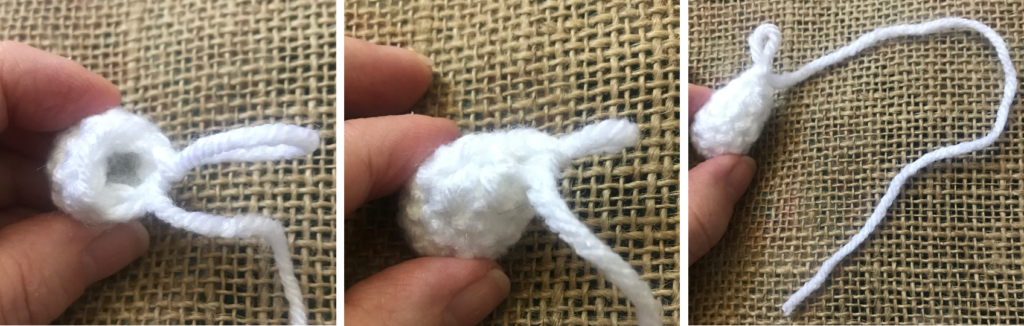
Round 5 – sc 1 in the first st, sc dec (next 2 sts), sc 1 in next, sc dec, sc 1 in next, sc dec, remove sm, sc 1 in last st, return sm in last stitch made (7). This will start to close up the end (left photo).
Round 6 – sc dec around, remove sm, sc 1 in last st (4) – (middle photo).
Cut yarn leaving a tail for stitching – do not tie off (right photo).
Add Your Heading Text Here
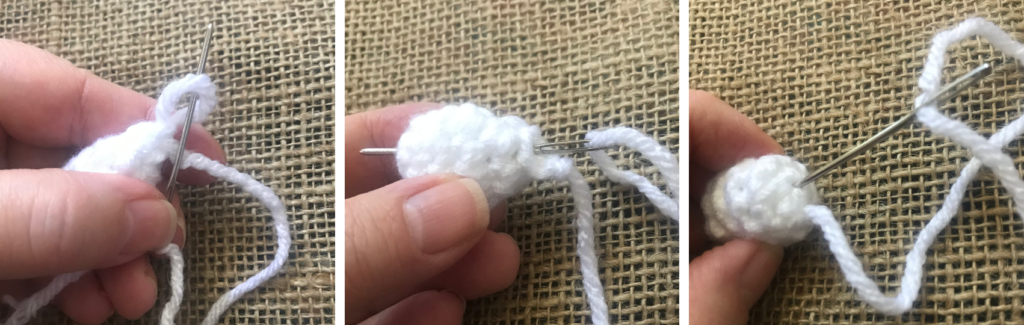
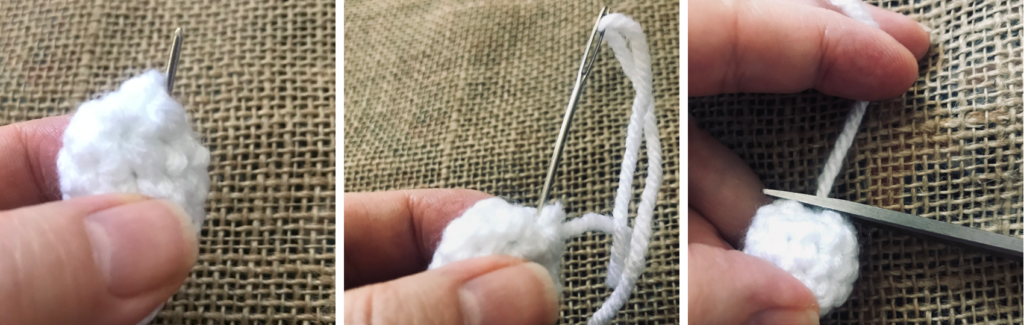
Thread your tapestry needle with the finishing tail, then insert your threaded needle through the loop that was left at the end of the last round (left photo).
Pull tail to close loop then insert threaded needle through the closed ending and push it out through the other end (middle photo).
Insert your threaded needle through that end (right photo) and push it back out through the closed end.
You will notice that each end will start to flatten out.
Add Your Heading Text Here
The closing end of the marshmallow will have some bulky stitching areas, so as you are bringing your threaded needle through from the other side, come up just to the side of the bulky stitching (left photo).
Then insert your needle down through the other side of the bulky stitching and pull through the other end (middle photo). This will flatten that bulky stitching.
Repeat this process with any bulky areas that need flattening, back and forth from end to end.
Cut tail as close to the finished marshmallow as possible without cutting through your stitching (right photo).
Add Your Heading Text Here
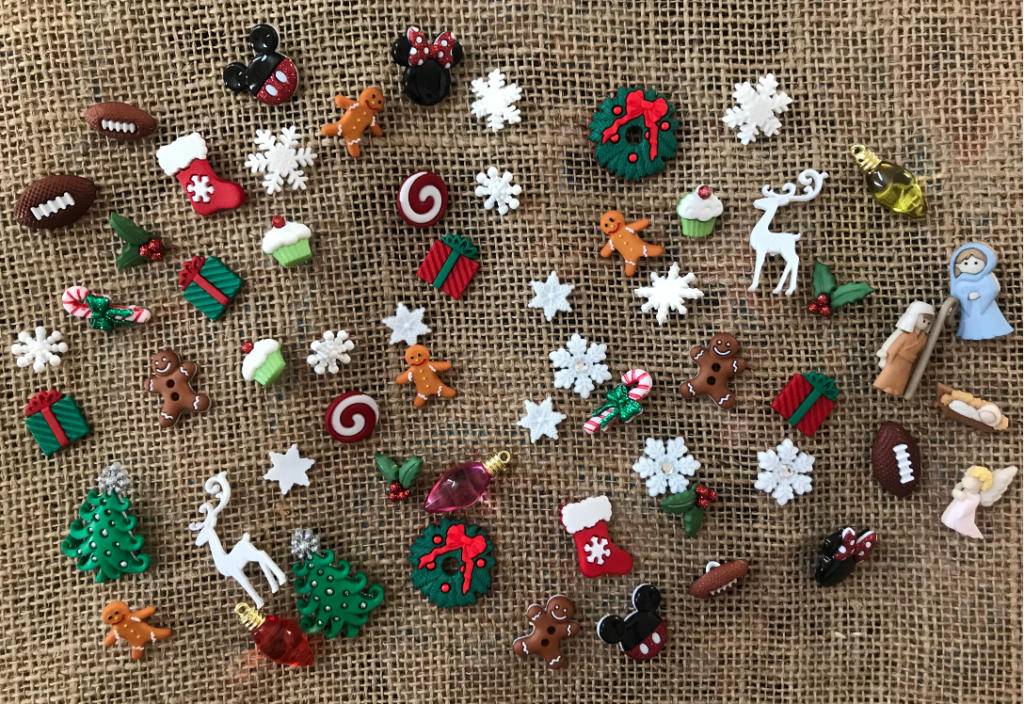
NOVELTY BUTTON EMBELLISHMENTS
Novelty buttons are so fun and there are SO many choices. I chose holiday buttons for my cocoa mugs, but you can really do any theme or occasion you like. If you are gifting your cocoa ornament, personalize it to the recipient’s likes!
Find Novelty Buttons at joanns.com
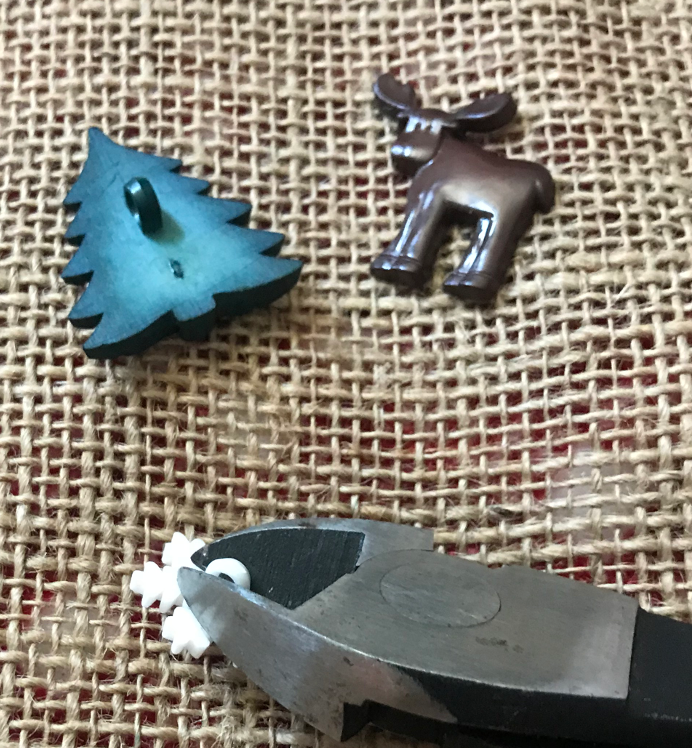
I chose to glue my buttons on, but you may choose to sew your buttons to the cocoa mug.
If you are gluing the buttons you will want to clip off the back loop with wire cutters.
Add Your Heading Text Here
CROCHET COCOA ORNAMENTS ASSEMBLY
Add Your Heading Text Here
CROCHET HANDLE
Find the finishing join side of the cocoa cup and attach the handle on that side (left photo).
Thread your tapestry needle with one of the handle tails, then stitch that handle end to the cup with 5 or 6 stitches to secure (middle photo). Make sure the rest of that tail ends in the inside of the cup.
Bring the other end of the handle around forming a loop and connecting the ends right up next to each other. With the second handle tail, stitch this end to the cup with 5 or 6 stitches to secure (right photo), with the tail ending in the inside of the cup, next to the first tail.
Tie the two tails in a knot to secure the handle in place.
Add Your Heading Text Here
FIBERFILL STUFFING AND HANGING LOOP
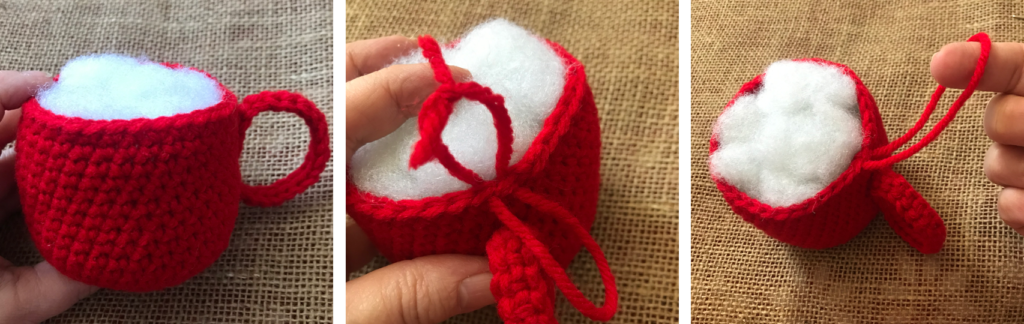
Stuff the cup with fiberfill. I stuffed mine pretty full, filling out the cup to the shape I liked (left phtot).
With the same color of yarn as the mug, cut an 8″L piece for the hanging loop. Thread this yarn through the top two stitches above the handle, forming a loop on the outside and with the two tail ends on the inside. Tie those ends in a tight knot to keep the hanging loop secure (middle and right photos).
Add Your Heading Text Here
CROCHET COCOA PLACEMENT
Place the cocoa cap over the fiberfill stuffing and begin gently tucking and pushing the cocoa edges down between the cup wall and the stuffing (left photo).
Press the cocoa edges down and in place with your fingers and your thumb until it fits nicely on the top of the mug (middle and right photos).

Add Your Heading Text Here
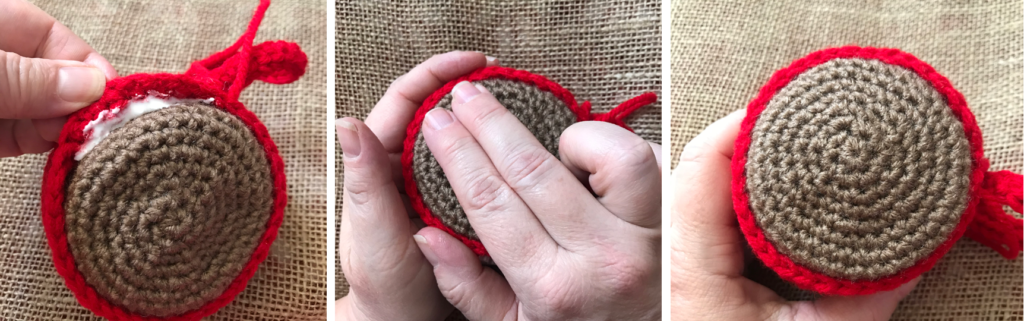
Once the cocoa is placed in the top of the mug, begin gluing small sections at a time (left photo).
Where the glue is, press the outside of the mug and the cocoa together with both hands for at least 30 – 45 seconds (middle photo).
Repeat around until the cocoa has been completely glued to the mug (right photo).
Add Your Heading Text Here
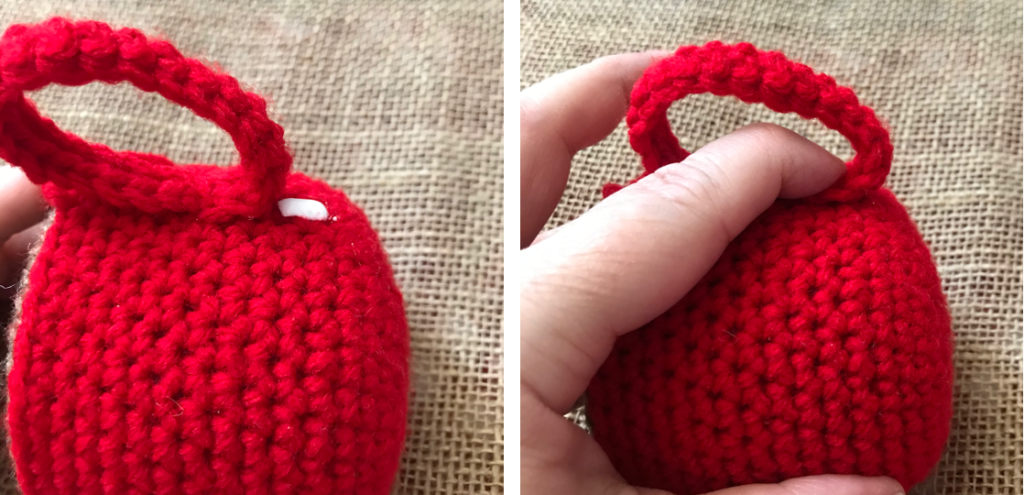
CROCHET HANDLE FINISH
To give the mug more of a real handle look instead of a round loop, place a small amount of glue just below the stitched bottom of the handle (left photo).
Press the bottom of the handle loop down over the glue and hold in place for at least 30 – 45 seconds (right photo).
Add Your Heading Text Here
CROCHET MARSHMALLOWS AND NOVELTY BUTTONS
Glue the three marshmallows to the cocoa at the top of the mug (left photo).
NOTE: Even though it is glued into place, the cocoa at the top of the mug will seem a little squishy/loose in the middle because it isn’t stuffed fully with fiberfill. That’s ok because it gives the marshmallows little places to “sink” into the cocoa.
Arrange the buttons how you like them first and then glue them to the front of the mug one by one, pressing each button to the mug for at least 30 – 45 seconds before moving to the next button (right photo).
Add Your Heading Text Here
FINISHED CROCHET COCOA ORNAMENTS
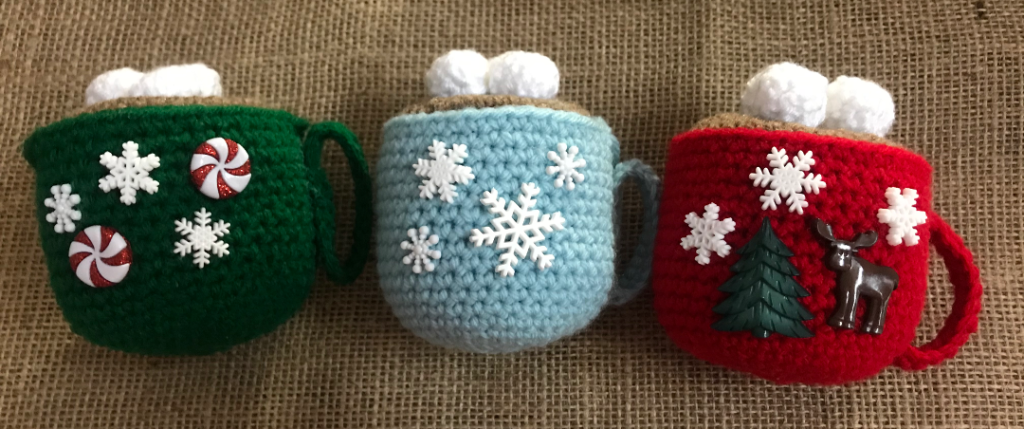
How cute are these crochet cocoa ornaments?! And with the button embellishments and variety of yarn choices the possibilities are endless! How many people on your list would love one of these cozy ornaments? I have quite a few!!
Happy Creating!

Check It Out!
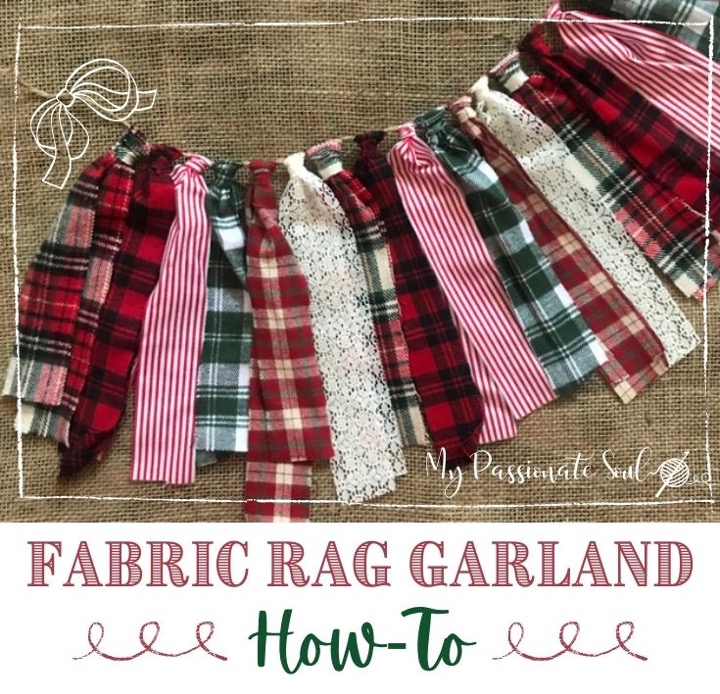
Give your holiday decor a warm and cozy feel with this Fabric Rag Garland made with flannel strips! Check out the complete How-To instructions here
kljkljlklklkj
Contact
I would love to hear from you! Feel free to leave me a comment below, use the ‘Contact Me’ section on the top menu bar and leave a comment there, or email me directly at mypassionatesoul123@gmail.com.
Subscribe
All subscribers welcome! If you would like to stay current and receive email updates with the latest My Passionate Soul news, alerts to new FREE patterns, exciting giveaway info and more, you can sign-up at the ‘Subscribe’ section of the sidebar menu. I promise you will never receive any spam, just yarn news and other crafty stuff!
***I put a lot of labor, love and time into the design of my patterns and create them for personal use only. Please do not sell my patterns and claim them as your own. Feel free to make and sell items you’ve made from my patterns, but if you do I ask that you link directly back to my post or blog and provide the link. You may also share my patterns on social media as long as you, again, link directly back to my post or blog and provide the link. Please do not copy and paste my patterns and claim them as your own. If selling items made from my patterns I ask that you use your own photos and do not re-publish any photos related to my patterns as your own. Thank you for your understanding.***
Becky
December 14, 2020 at 12:12 pmOh my gosh, I love these!! You don’t happen to make them to steel do you?
Becky